How to Set Up a WordPress Multisite Multi-Network
WordPress Multisite is pretty awesome in its own right, but did you know it's possible to create a network of Multisite networks, i.e. a network of networks? Here's how to set it all up.

WordPress Multisite is an awesome tool in its own right that enables you to create a network of WordPress websites, but did you know it’s possible to create a network of Multisite networks, i.e. a network of networks?
A multi-network allows you to have virtually infinite Multisite networks, all using a single WordPress install and database. Each network can host virtually infinite child blogs/sites. Take that Christopher Nolan!
There are great benefits to having a multi-network as well as risks: on the one hand, you have a single install with centralized updates for all networks and blogs/sites – all of your networks conveniently located in the one place. On the other hand, you have one single install with centralized updates for all networks and blogs/sites… having everything in one place can make you vulnerable to hacking attacks and other security issues.
Despite the pros and cons, it’s well worth exploring how multi-networks work, especially if setting one up could be beneficial for your development activities or business. So in this article, I’ll walk you through how to set up a multi-network.
Continue reading, or jump ahead using these links:
- Before We Get Startd
- Getting Started with Multi-Network for WordPress
- Setting Up Domain Mapping on a Multi-Network
- Creating a Network
- Creating a Blog/Site
- Moving a Blog/Site From a Network to Another
Before We Get Started…
There are a few things worth pointing out before we dive into how to set up a multi-network.
Firstly, each Multisite running under a multi-network is a complete Multisite. You have to access the network admin dashboard on each network you create, and set up network settings, same for each blog/site. Your networks share the same physical WordPress install and database but work as independent Multisite networks.
Secondly, it’s important to have a plan for your multi-network. You should always upscale your system as – or before – it grows. Prior planning is key and if you plan – and upscale – before the need arises, your multi-network should succeed.
At some point you will have to learn about DB Sharding – it’s not rocket science, but it’s a kind of more hardcore task and beyond the scope of this article. You will probably need to hire or get help from a DevOp in order to plan and implement DB Sharding.
If you start digging into the database for a Multisite install, you will realize the same site_id=1 for all blogs/sites, located in the database table ending in _blogs. Each blog/site will have a unique blog_id, but they are all under the same site_id=1. You will also note a database table ending in _site. It’s here where a multi-network writes a unique site_id for every new Multisite network you create.
WordPress terminology is a bit confusing here: SiteID actually refers to a Multisite or network, and BlogID refers to any blog/site under it.
Another cool feature: multi-network allows you to move any blog/site from any of your Multisite networks to any other network running on the same multi-network install – all with minimal backend configuration.
I will guide through all that in this article.
Getting Started with Multi-Network for WordPress
First up, we need a working WordPress Multisite install. I used cheap shared hosting while putting together this tutorial, but if you plan on building a serious multi-network, cheap hosting isn’t going to cut it – your multi-network needs to be able to support large amounts of traffic and queries, so you’ll have to migrate to some serious hosting at some point (and it’s always better to do it before you actually need it!).
Once you’ve got your Multisite network installed, it’s time to unleash your multi-network! Enabling it is very easy – fortunately, there are some great plugins available in WordPress to help you do it. My choice is WP Multi Network, developed by John James Jacoby, the mastermind behind the existence of multi-network in WordPress core. John explains how multi-network works in this video.
Okay, so let’s start setting up multi-network.

1. Go to your Multisite network admin dashboard.
2. In the sidebar, go to Plugins > Add New.
3. Click the Search Plugins field in the top-right and enter “WP Multi Network.”
4. Click Install Now and after the plugin installs, click Network Activate.

You should now see the Networks panel as the very top menu in your network admin dashboard, but in order to make multi-network fully operational, you need to make some further changes to your wp-config.php file.

5. Using your preferred method of editing files in your WordPress directory, be it cPanel, FTP, or something else, find the following lines:
Now comment out the line with define('DOMAIN_CURRENT_SITE', yoursite.com);
Of course, yoursite.com is example text and in your case should be your domain name.
Congratulations! You’re now running a multi-network!
Login to your network and go to your network admin dashboard. Now you can start adding and managing networks (or Multisites) on your multi-network.
Setting Up Domain Mapping on a Multi-Network
The WP Multi Network plugin manages the networks you create for your multi-network. This means you can create a whole network as a sub-directory of your master network (the Multisite network you created first). Or you can choose to have a different domain for each network (or Multisite) under your multi-network, which the WP Multi Network plugin takes care of.
You will be able to map domains to any child blog/site under any of your networks using our Ultimate WordPress Multisite Domain Mapping Guide. If you choose to map domains to your other networks or blogs/sites, each domain must be configured to point to your multi-network’s physical IP or public_html directory.
This is done using the domain control panel provided by your hosting company, usually cPanel. If you use cPanel, you will have to add your domains as Aliases (or Parked Domains) or Add-on Domains (depending on your hosting plan), and point each of them to the same directory of your WordPress install. Normally it is public_html, but it may be different depending on your web host’s settings.

If you’re using WPMU DEV Hosting, you’ll do all of this directly from The Hub. You can find information about doing this in our documentation or contact our 24/7 support.
If you use DNS Made Easy or another DNS tool, you will have to add an ANAME Record for each domain you want to map to your network, pointing to the same physical IP of your WordPress Multisite install. After doing this and waiting for the DNS changes to propagate (this may take some time), your domains will be redirected to the same directory (cPanel) or IP (DNS Made Easy).
I have registered two domains that I will use for this install. Each domain have an active SSL – we need an SSL for each domain (or a multi-domain SSL covering them all):
- https://awpmu.cloud/ – this will be the main (or master) network.
- https://lwpmu.cloud/ – this will be a child (or slave) network.
I’m going to organize my main network in the following way:
- Multi Network Main Multisite – AWPMU Multi Network
- Main Network Address – https://awpmu.cloud/
- Main Multisite Site – AWPMU Network – Main Site (tagline)
Next, I’m going to create a child network (or Multisite) this way:
- Multi Network Child Multisite – LWPMU Network
- Child Network Address – https://lwpmu.cloud/
- Child Multisite Site – LWPMU Network – Main Site (tagline)
I’ll also create a child blog under each Multisite:
- Main Multisite Child-Blog – https://awpmu.cloud/blog01/ – Blog 01
- Child Multisite Child-Blog- https://lwpmu.cloud/blog02/ – Blog 02
Finally, I’ll move these child blogs from one Network (or Multisite) to the other, doing some small changes needed to end things like this:
- Master Multisite Child-Blog – https://awpmu.cloud/blog02/ – Blog 02
- Slave Multisite Child-Blog- https://lwpmu.cloud/blog01/ – Blog 01
Creating a Network
It’s very simple to create a new network. Here’s how you do it:
1. Go to your Multisite network admin dashboard and click on the first menu item, that is, the Networks icon created by the WP Multi Network plugin. In the top-left, click Add New. Fill in the required fields.

2. Enter a network title. This is the name of your new Multisite. Try to use a name that’s memorable.
3. Enter the domain you mapped in your cPanel or domain control panel in the previous steps in this tutorial. You can use your main domain with a path if you don’t want to map another domain to your new Multisite.
4. Enter a site name, i.e. the name for your new Multisite main site.
5. Enter a path. Only use this option if you want your new network to be in a sub-directory of the original (main) network, or a sub-directory of any other domain already mapped to the same public_html directory (cPanel) or IP (DNS Made Easy or other domain control panel you use).
Note: DNSpropagation may take some time, up to 72 hours. I prefer to use DNS Made Easy because it delivers the fastest DNS propagation I could find.

6. Click Create. You will then be redirected back to the Networks page in your network admin dashboard.

You can see now that we have two networks (or Multisites), each one with a default automatically created site under it.
7. Go to your PHPMyAdmin (also part of cPanel, though your access to it may depend on your host’s settings), and you’ll find a bunch of new tables in your network’s database. Check on the database table ending in _site, and you will see our new Multisite with id=2, and on the database table ending in _blogs you see the new site with blog_id=2, and site_id=2.


8. Before we do anything on our new child/slave Multisite, let’s first create a child blog under the original Multisite (site_id=1, AWPMU Multi Network on my Multi Network). Go to Sites in the sidebar in your main network admin and create a new site. You will see the main multi-network site there. In my case, I have awpmu.cloud).

Creating a Blog/Site
If you already use WordPress Multisite, you already know creating a new blog/site is pretty simple, but let’s go through the steps anyway:
1. In your network admin, go to Sites > Add New and enter the details you want for your new child blog/site. When you’re done, click Add Site.
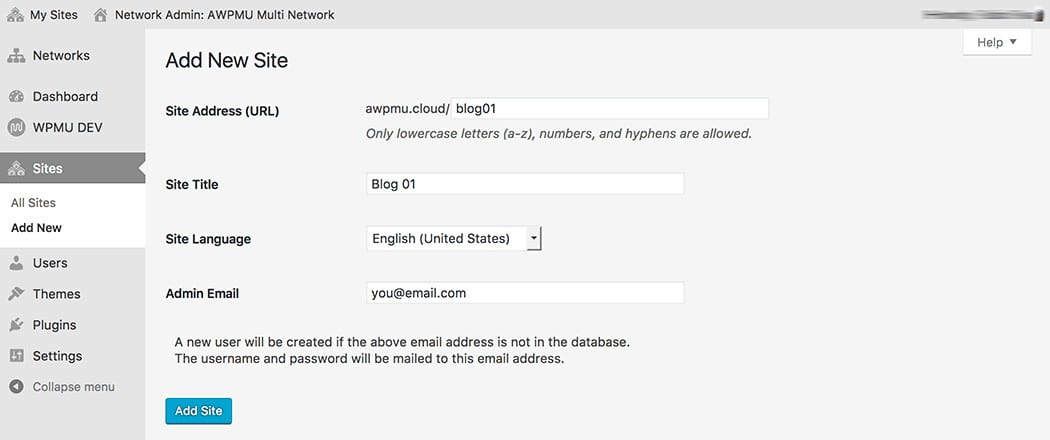
You will have the option to create another child blog, but for now, click Sites in the sidebar to check that your new site is there.

Looking good!
You can visit the new blog to check that it works and go to its separate admin dashboard to set it up. But for now, let’s check the multi-network database again in PHPMyAdmin, and specifically, the database table ending in _blogs:

You will see the new child blog/site there: it uses blog_id=3 and site_id=1 because it’s under AWPMU Network/Multisite. Go to the LWPMU child/slave Multisite network admin dashboard to create a new child blog/site. When you log in to your “child” Multisite for the first time, you will be invited to upgrade your network, so do that before proceeding.
Repeat step 1 to create Blog 02 in our child/slave network (site_id=2).
Then go to Sites in the LWPMU network admin dashboard and verify the new child blog is there.

Next, let’s take another look on PHPMyAdmin. You will notice several new tables ending in 2, 3 and 4 (for the recently created Multisite and both the child blogs/sites we have created (one for each network/Multisite). The new child blog/site has blog_id=4 and site_id=2 in the database table ending in _blogs . This means it’s under our child/slave Multisite, in my case, it’s named LWPMU Network.

Moving a Blog/Site From a Network to Another
Now let’s take a look at moving blogs/sites between networks within the overall multi-network.
1. Go to your child/slave Multisite network admin dashboard. On my install, it’s located at https://lwpmu.cloud/wp-admin/network/
2. Click on Sites, then hover your mouse over /blog02 Child-blog/. You will see the Move command appear on the far right. Click it.

3. Click on the drop-down menu and select https://awpmu.cloud/ as the new network for this blog/site.

4. Next, click Move to make the move.
You’ll see that Blog 02 has disappeared from the Sites page. You can also check the message at the top of your dashboard confirming that the blog/site was moved.
6. Go now to your main/master Multisite network admin dashboard. On my install, it’s located at https://awpmu.cloud/wp-admin/network/
7. Click on Sites. You’ll see that Blog 02 is now there. You’ll also see that it’s still as https://lwpmu.cloud/blog02, but we want it to be under the AWPMU domain. Hover your mouse over it, and click Edit.

8. Change the Site Address (URL) from lwpmu.cloud to awpmu.cloud, then click Save Changes.

9. Click again on Sites in the sidebar and check the new address.

10. Now, open PHPMyAdmin again and find the database table ending in _blogs. Check the new site_id for blog02. This confirms that both blog01 and blog02 are now running under the AWPMU main/master Multisite, both with site_id=1.

11. Repeat steps 1 to 9 above. Let’s now move our Blog 01 from the AWPMU multi-network to the LWPMU network. Then go to the child/slave Multisite network admin dashboard, click on Sites, and edit Blog 01 so that it’s running under LWPMU. Lastly, check PHPMyAdmin again and you’ll see that Blog 01 is now running under lwpmu.cloud (site_id=2).

Your Multi-Network is Now Up and Running!
You can now start planning and implementing your Multisites and their blogs/sites under your multi-network.
Remember that every network you create on your multi-network will have its own network admin dashboard and settings – they’ll share the same physical install and database, but they will behave as totally independent Multisites.
From this point on, I encourage you to play as much as possible with your new multi-network!
Share article
All the good WordPress stuff, once every two weeks
Subscribe
Create your free account to post your comment
Login to post your comment