1. Getting Started
Developed exclusively for WordPress sites, our managed hosting solution provides dedicated IP, memory and storage space in highly configured Virtual Private Servers for each site hosted.
If you are not using WPMU DEV hosting, learn more about pricing, what’s included, and how to get started free.
Get your own hosting for WordPress reseller business up and running in a flash! See How To Become a White-Label Reseller of Hosting for WordPress on our blog for all the juicy goodness.
Every WPMU DEV hosted site comes fully loaded with Pro versions of our award-winning plugins automatically installed for you. Check out 7 Pro Plugins Now Included Free With WPMU DEV Hosting on our blog for all the details.
To compare our done-for-you hosting to setting up and self-managing a VPS hosting environment yourself, check out Optimized Hosting for WordPress: DIY or Managed? on our blog.
1.1 Go Live Checklist
Copy chapter anchor to clipboardGoing Live with WPMU DEV Hosting
If you’re reading this chapter, you likely already have your WPMU DEV hosted site created, migrated or cloned at a temporary tempurl.host URL, and have it all set up the way you want it.
You’re now ready to take it live at your own domain name? Excellent! Use this go-live checklist to help you get up and running in no time!
- Add your custom domain name
- Update the DNS (NS or A/CNAME)
- Double-check all other DNS records
- Check DNS propagation
- SSL installation
- Make your custom domain primary
If you get stuck at any point in this process, just start a new chat anytime with our support superheroes.
1. Add your custom domain name
The first thing you’ll want to do is add your custom domain name to the Domains list in the Hosting section of your site in your Hub.
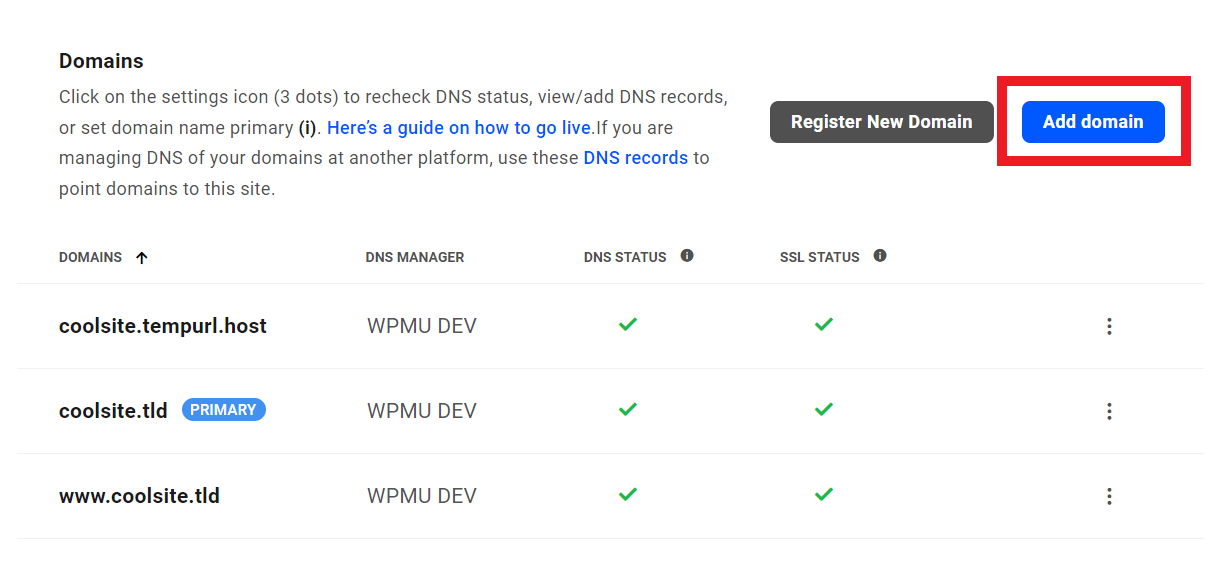
The tool there provides you with an option to also add the www version of your domain if you wish. While www is no longer needed to access sites on the web, some users continue to use it. If you don’t add the www version of a site, those users won’t be able to load your site if they enter the www version in their browser.
And no worries, if you include the www version but don’t want it in the site address, just make the non-www version the Primary Domain in the last step below. Anyone who then enters your domain name in their browser with the www will be instantly redirected to the non-www address.
You’ll also see an option to Add DNS records for this domain. That option is checked by default so you can follow our recommendation to manage the DNS for your custom domain in the DNS manager of your Hub, as seen in the 1st option of the next step below.
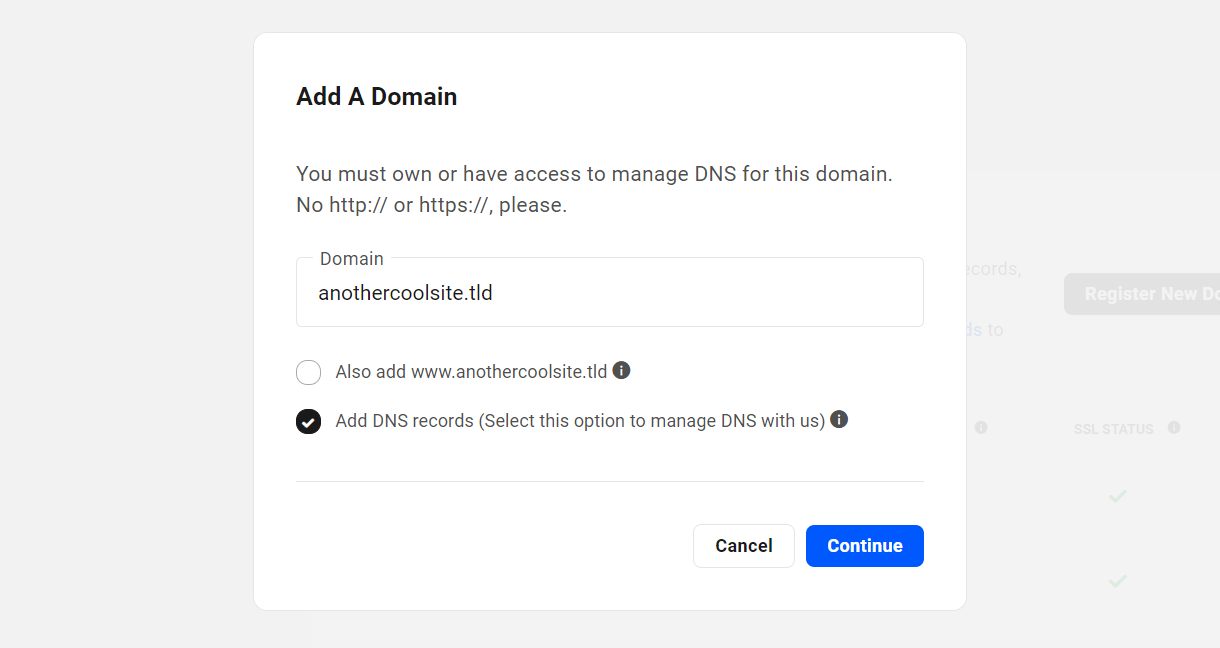
For more information about adding your custom domain name, see our Add a Permanent Domain guide.
With our annual hosting plans, you’ll get complimentary domain and webmail credits worth purchasing a .com domain and a year-long subscription to a webmail account at WPMU DEV.
2. Update the DNS (NS or A/CNAME)
Once you’ve added your custom domain name in your Hub, you’ll want to update the DNS records for that domain. There are 2 ways you can do that:
Manage the DNS in your Hub here at WPMU DEV
Manage the DNS at the domain registrar or 3rd-party DNS manager
Manage the DNS in your Hub here at WPMU DEV
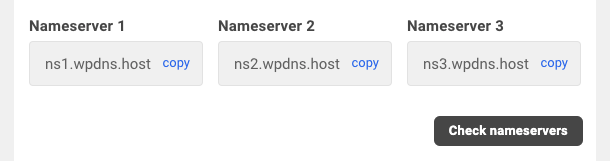
For this option, all you need to do is update the nameservers at your domain registrar so they point here instead. Be sure to add the domain to your Hub first though so there’s a DNS zone created for it, otherwise changing nameservers at your registrar may fail.
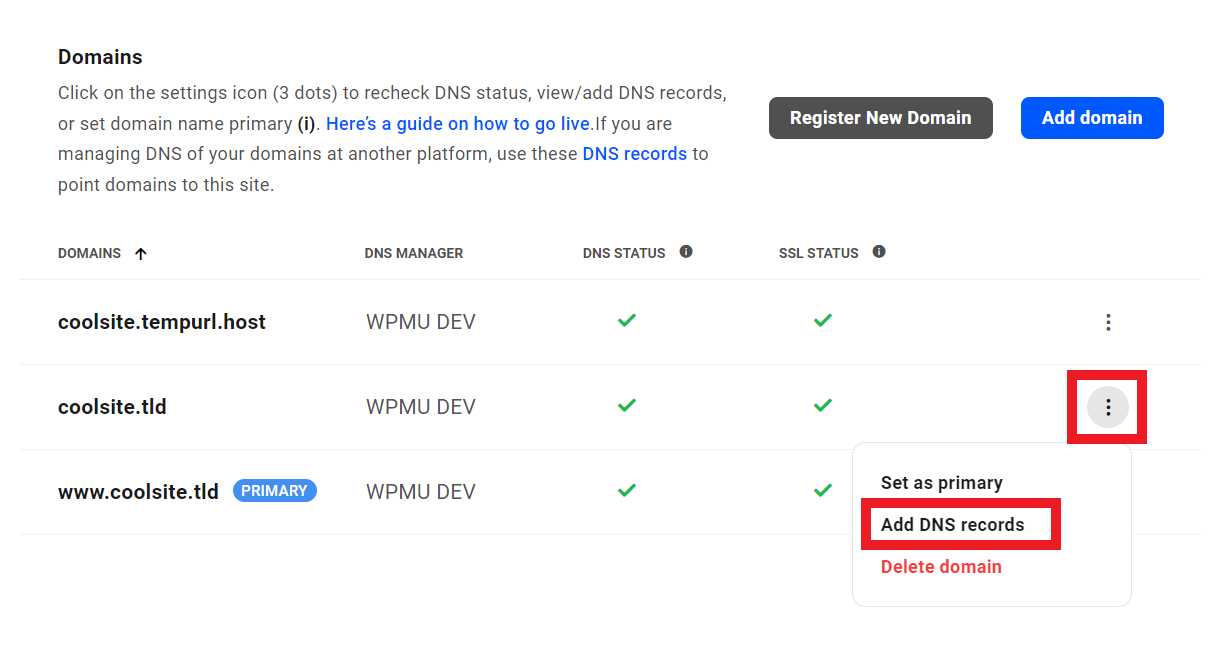
Note that if you did not check the Add DNS records option when you added your custom domain in the 1st step above, you can simply click the three-dot icon to the far right of your domain name now, and select Add DNS Records. That will automatically add your domain and its DNS records to the DNS manager in your Hub.
You’ll find the WPMU DEV nameservers you’ll want to set at your domain registrar are shown in your Hub DNS manager once your domain name has been added there:
ns1.wpdns.host
ns2.wpdns.host
ns3.wpdns.host
For more information on changing nameservers, along with a handy link list of guides from popular registrars, see our Change Your Nameservers guide.
See How to Point a Domain to WPMU DEV Hosting on the blog for a detailed walkthrough on updating nameservers & DNS records for a 3rd-party domain that you want to use on a WPMU DEV hosted site.
Manage the DNS at the domain registrar or 3rd-party DNS manager
If you prefer to manage the DNS records of your domain at your domain registrar, or in a 3rd-party DNS manager like Cloudflare, you’ll need to update the main A/AAAA or CNAME records there.
The DNS info you need for your domain can be found by clicking the DNS records link in the description at the top of the screen.

We recommend using the CNAME to point your custom domain to the tempurl.host domain of your site if possible, as that method is independent of the site’s IP address. However, many registrars do not support CNAMEs for top-level domains, so you’d use the A & AAAA records instead.
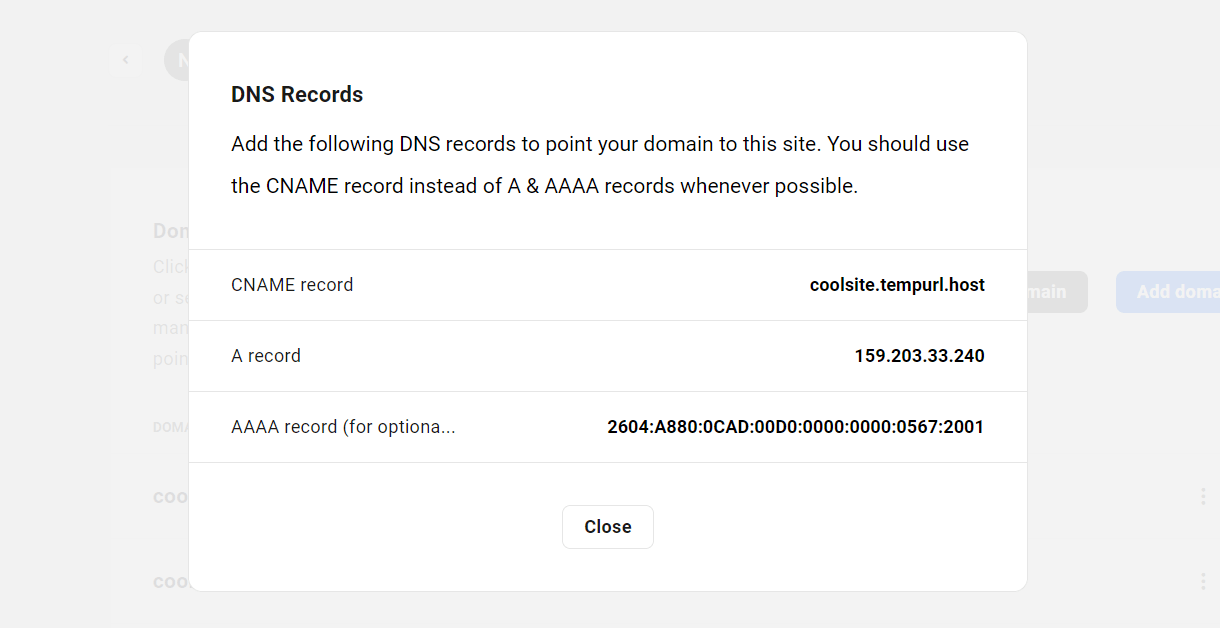
For more information about updating DNS at your registrar, see our DNS Records guide.
If you are routing your domain through Cloudflare and managing the DNS there, please also see the Cloudflare chapter in our registrar guides for important information regarding the SSL/TLS settings there.
3. Double-check all other DNS records
You’ll want to ensure that all other needed DNS records like MX/SPF/DKIM/DMARC exist and are correctly added.
For example, if you have changed your domain’s nameservers to manage its DNS in your Hub, you’ll want to copy those records to your Hub as well.
Or if you previously had both your domain and hosting on another platform with email tied to the hosting, then changed the A/AAAA or CNAME record of the domain and cancelled the hosting, you would need to migrate your emails to another provider. In this case, please do consider migrating to our Webmail service. You can also review our other available email options.
4. Check DNS propagation
Now that you’ve updated your custom domain’s DNS records, you need to wait for those changes to propagate throughout the world so your custom domain resolves to the right place (your WPMU DEV hosted site) from all locations.
Don’t worry, your site will still function just fine at the tempurl.host address in the meantime.
DNS changes can sometimes take only a few minutes, but often take several hours to propagate. The time it takes is completely out of your control as it depends entirely on the registrar and communications between servers/providers.
However, you can easily check on the progress of the DNS propagation using a handy DNS lookup service like DNSChecker.org.
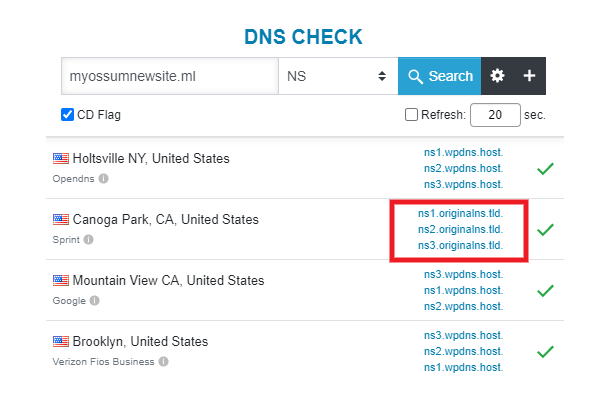
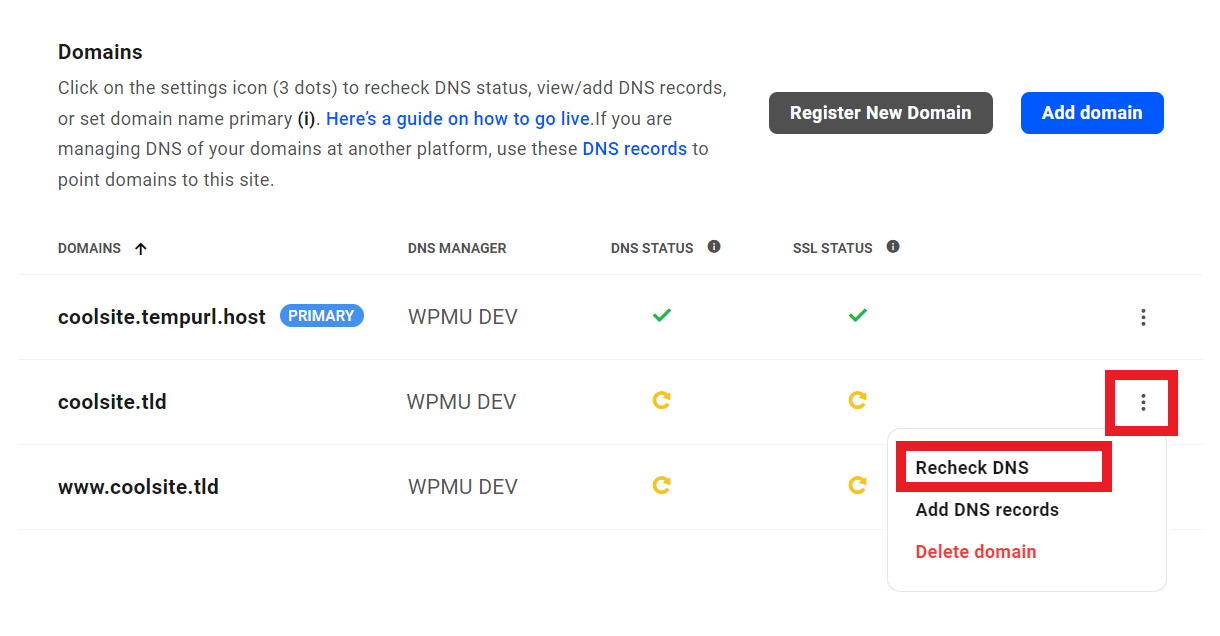
Once the DNS has fully propagated, you should see a green checkmark in the DNS Status column for that domain in your Hub. If it still shows a yellow circle, click on the three-dot icon to the far right of that domain and select the Recheck DNS option to refresh the data.
For more information about DNS propagation, see our DNS Setup Tips & Troubleshooting guide.
5. SSL installation
The installation of an SSL certificate on your domain is taken care of for you automatically here at WPMU DEV.
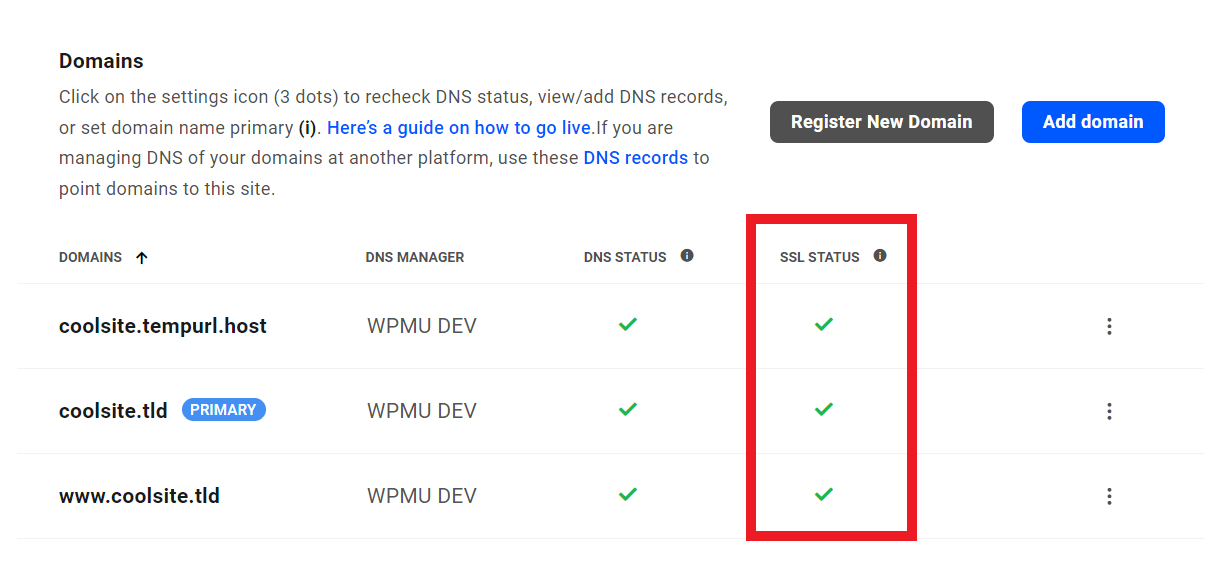
A regular SSL certificate will be installed on your domain as soon as the DNS has propagated, and you’ll see a lovely green checkmark next to the domain name in your Hub when that happens.
However, if your site is a multisite install, you’ll likely want to generate a wildcard certificate for it so all your subsites are also secured by the same certificate.
For more information about the types of SSL certificates we provide, and how to troubleshoot any issues, see our SSL FAQs, Errors & Troubleshooting guide.
6. Make your custom domain primary
Once both DNS Status and SSL Status are all green under the Domains tab for your site in your Hub, the last step is to set your custom domain as the Primary domain for your site.
That way, regardless of which domain associated with the site is entered in a browser, your site will resolve at your custom domain name.
To get that done, all you need to do is click the three-dot icon at the far right of your custom domain name, and select the Set as Primary option. Note that this option only appears once both DNS Status and SSL Status show green checkmarks.
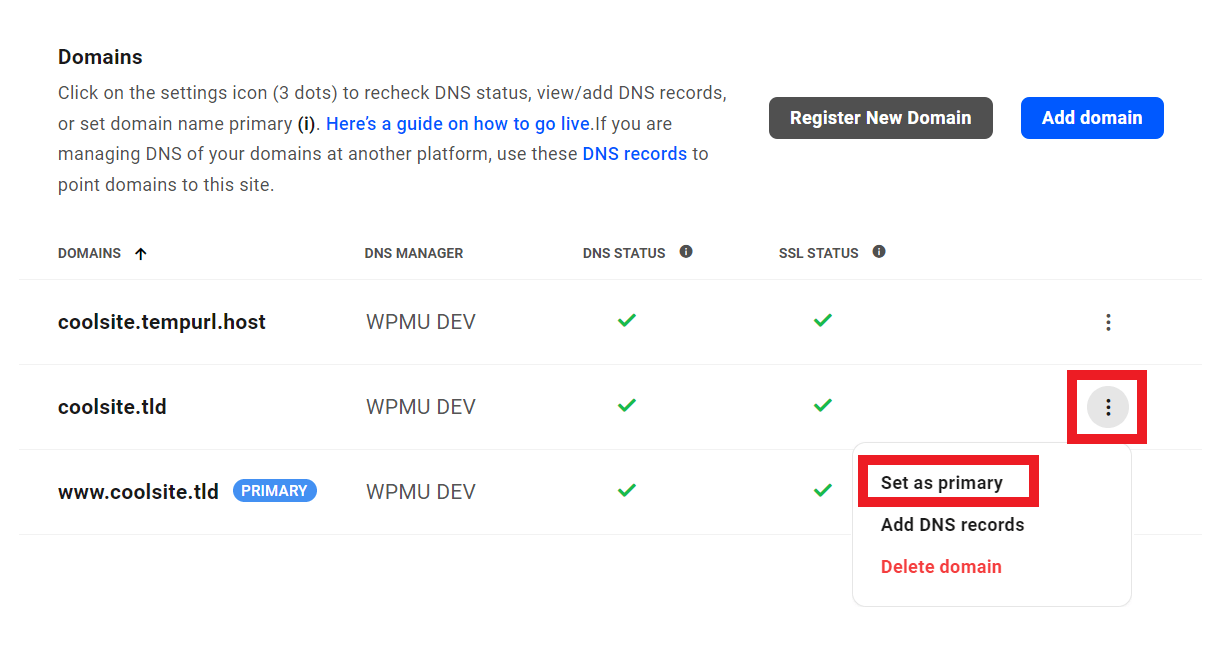
For more information about setting the primary domain for your site, see our Set primary domain guide.
1.2 About Free Sites
Copy chapter anchor to clipboardDepending on your WPMU DEV membership plan, it may include hosting credits that can be applied toward the cost of sites hosted with us.
We do this by applying a hosting credit to your membership account that can be used to defer the per-site costs associated with whatever hosting plan you choose.
You can see more about our pricing on the Hosting Overview page. See also How WPMU DEV Hosting Credits Work for details on how hosting credits are applied.
1.2.1 Archiving Unused Sites
Link to chapter 2Efficient allocation of resources is one of the ways we keep costs down for all members. Therefore, free sites will be archived after 21 days unless a permanent domain has been added to the site and set as the Primary domain, or the site’s Hub has been visited at least once per 21 days.
Members are notified by email at least seven days before a site is archived and can prevent that from happening for another 21-days simply by clicking a link in that email. There is no limit to the number of times members can extend that 21-day period and sites that have been archived can be reactivated within 30 days by contacting support, or see Restoring a Deleted Site below.
Note that if you have added a custom domain and set it as the Primary domain, it may still get archived if that domain’s DNS records are not resolving properly. Please review our Domains documentation for troubleshooting tips, and don’t hesitate to contact our support superheroes for help with this or any other issue you may be having.
1.3 Creating a New Site
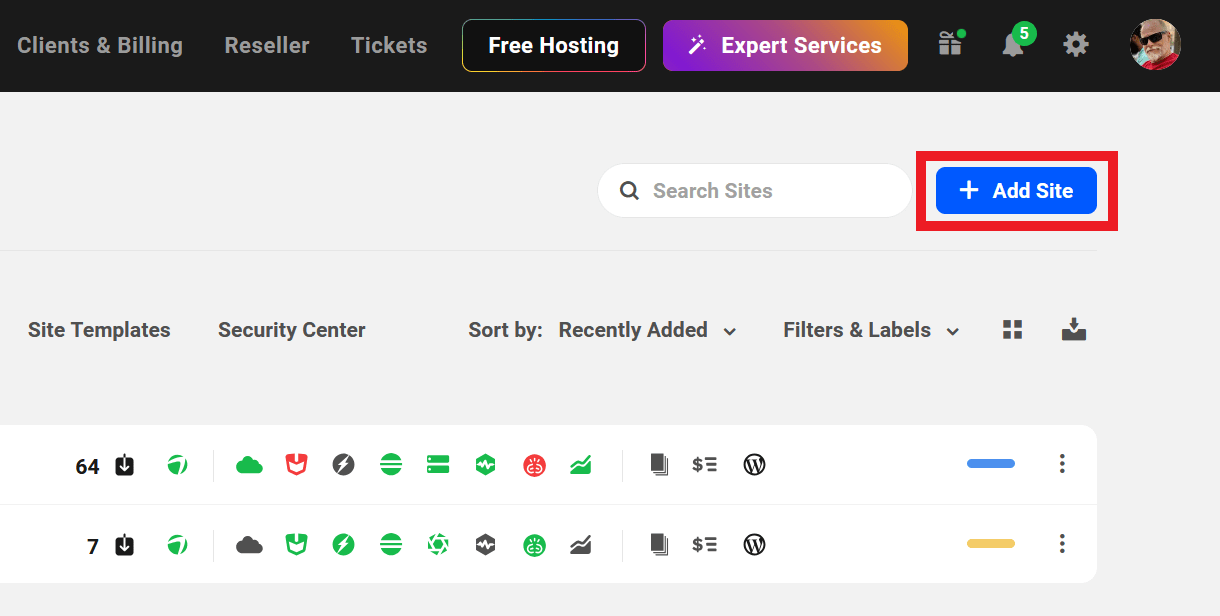
Copy chapter anchor to clipboardAll WPMU DEV members can create and manage new hosted sites in The Hub.
From the Hub site overview screen, click the + Add Site button.
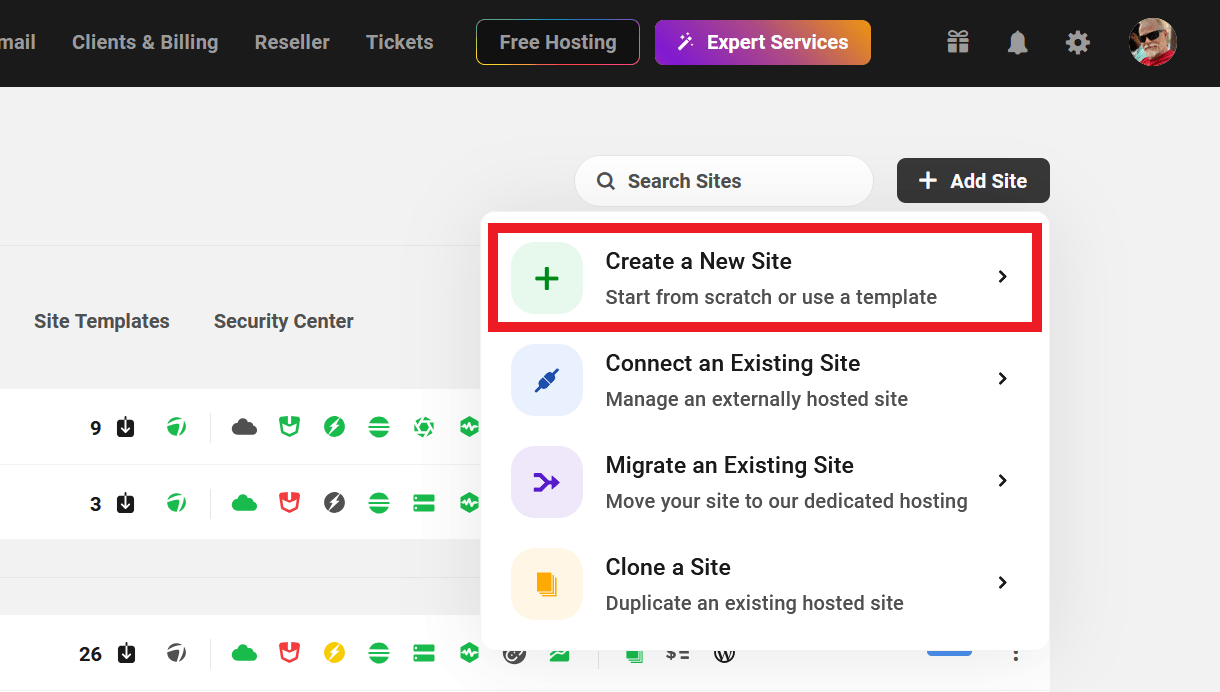
Then click Create a New Site in the options menu that pops open.
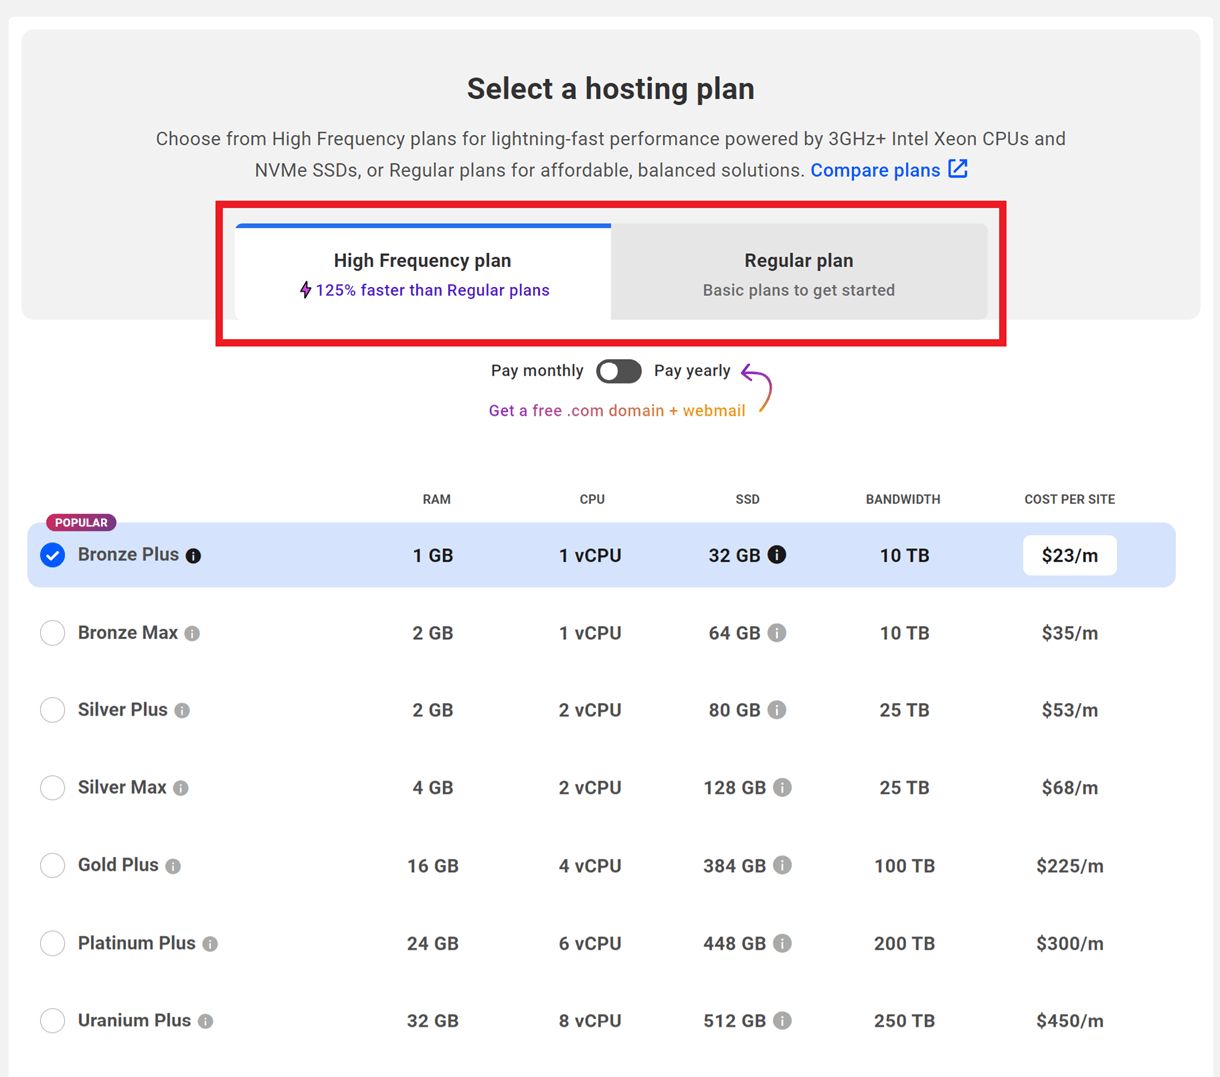
You’ll first be prompted to select the hosting plan you want for your new site.
By default, only the most popular monthly plans are shown. Click the View all pricing plans button at the bottom to reveal all of our Regular and High Frequency plans, as well as the yearly payment option. With our annual hosting plans, you’ll get a complimentary .com domain and webmail account for a full year.
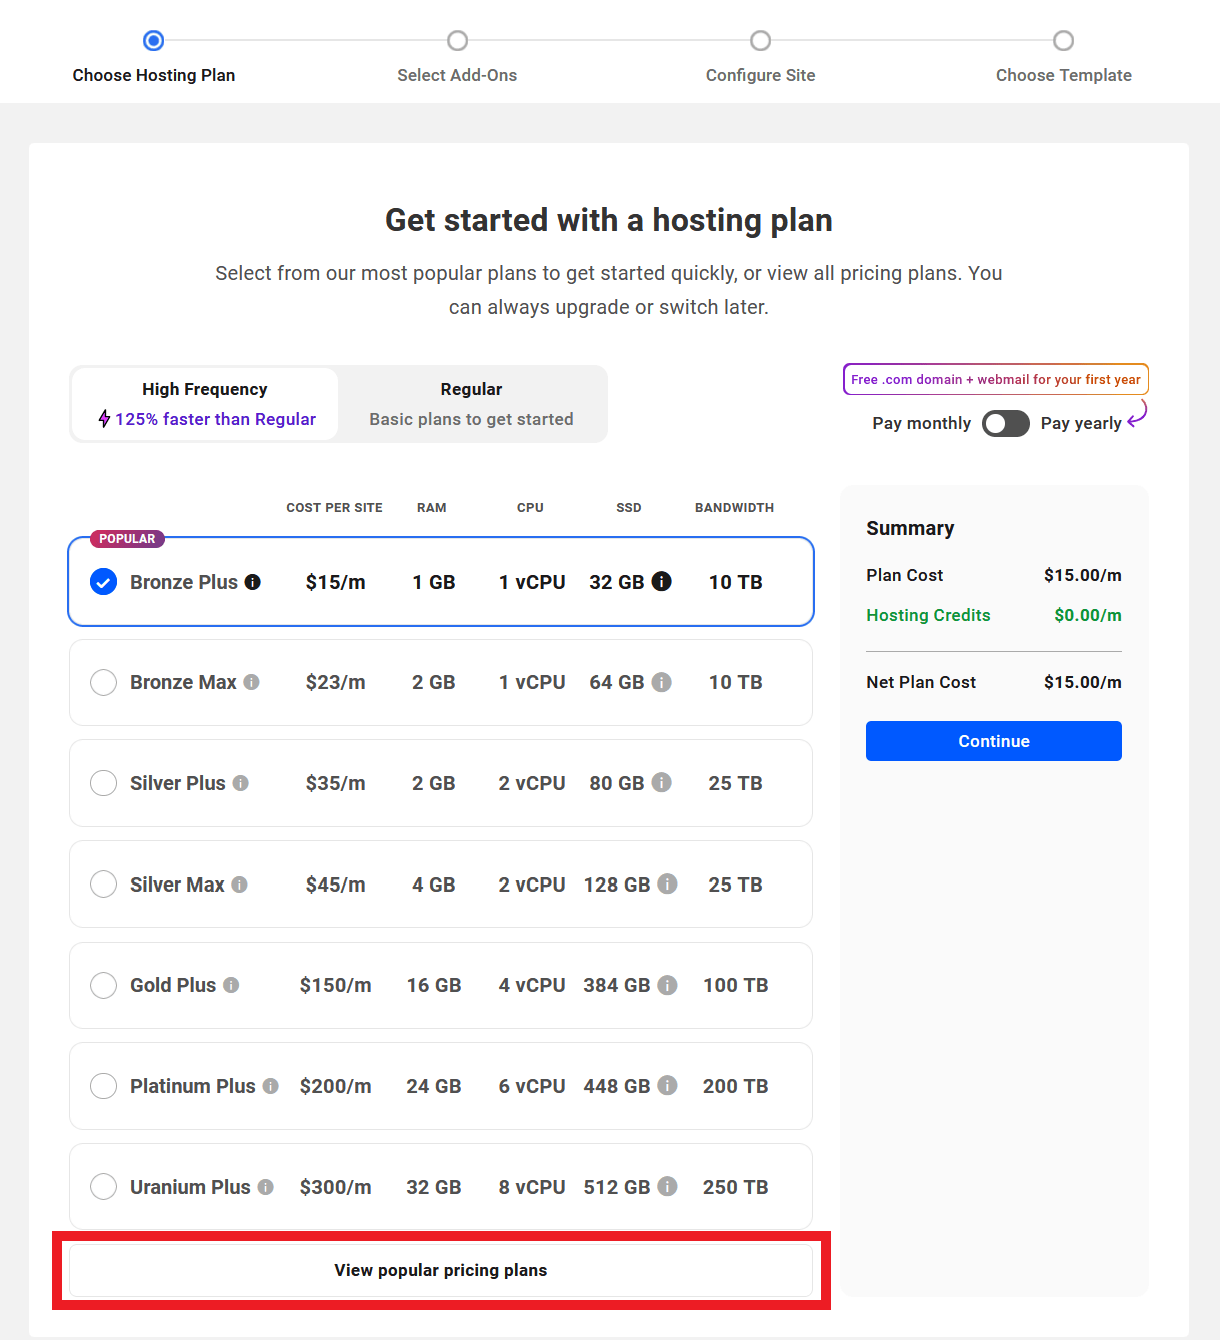
Note that if you just signed up to WPMU DEV on a Hosting Only plan, you would not see the plan table above unless you quit the onboarding process and come back later, in which case the hosting plan you signed up on would be locked in.
Next, select the optional add-ons you want to include with your hosting plan. You can choose to activate the Proactive Monitoring service and/or Hourly Backups when you create a new site.
Click the Continue button to proceed to the next step.
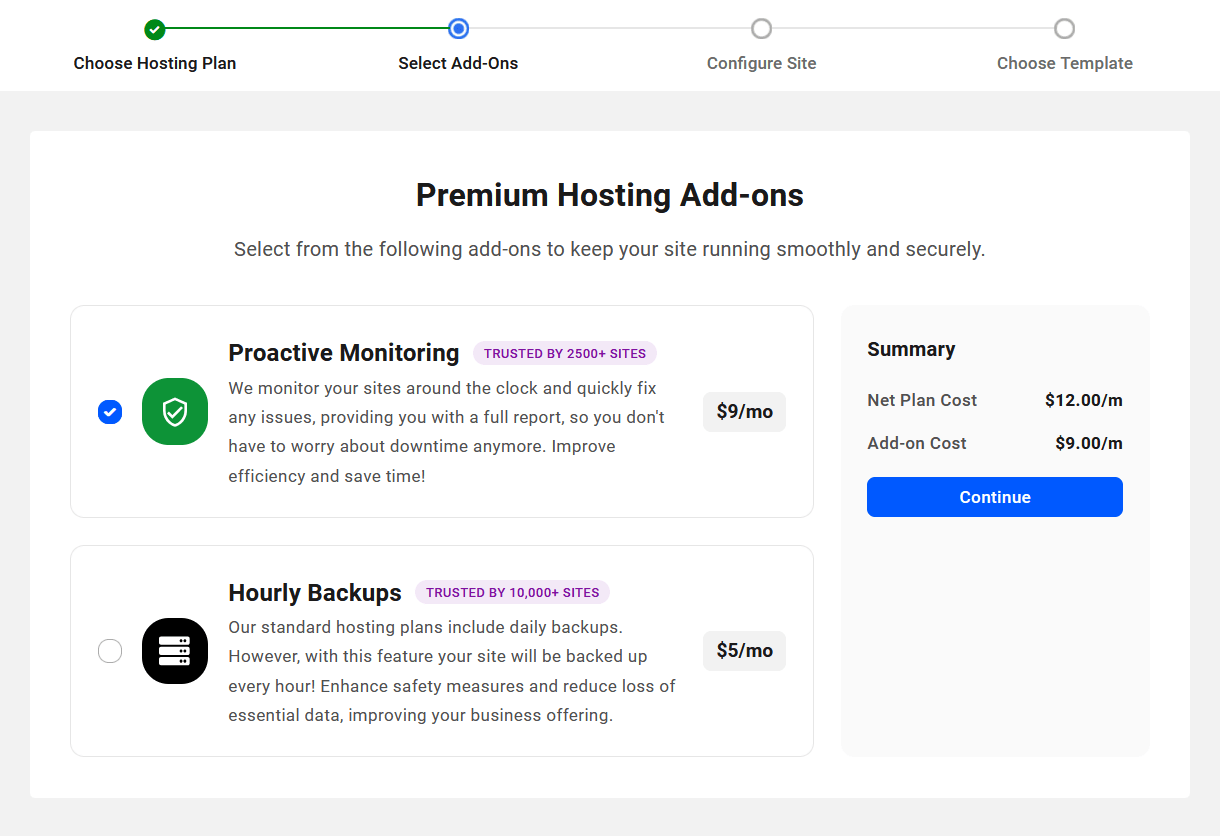
If you don’t wish to activate the Proactive Monitoring add-on, you can instead activate the Uptime service on the site once it’s created, and monitor things yourself. And, of course, your hosted site will receive automatic nightly backups if you don’t want or need hourly backups at this time.
Note that add-ons can only be purchased on a monthly basis, so this step will be skipped if you select a yearly payment plan. You can always activate these and other add-ons on a site after it’s created by going to the Add-Ons section on your WPMU DEV Account page.
Also note that the Hourly Backups option is not available for selection for sites hosted on the Quantum plan. See Quantum Plan Restrictions for details.
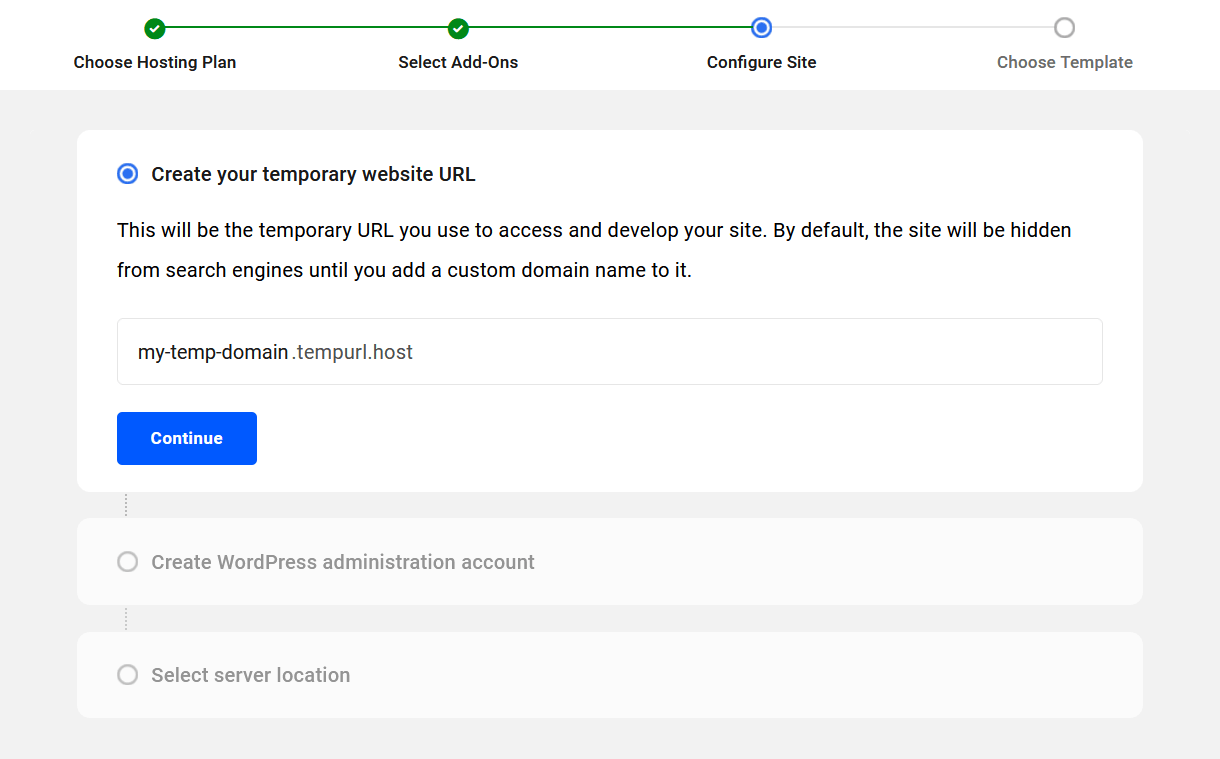
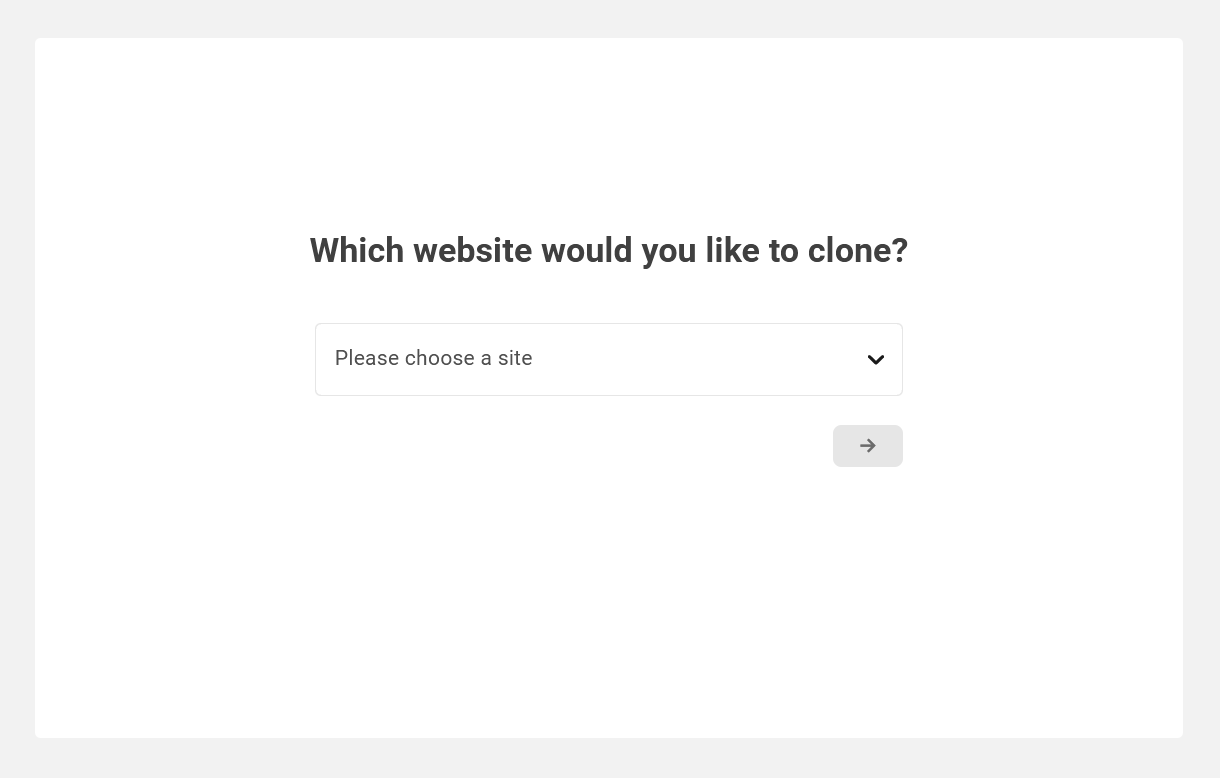
On the following screen, configure your site details. Start by entering the temporary domain name you want to use to access the site while you’re building it, then click Continue.
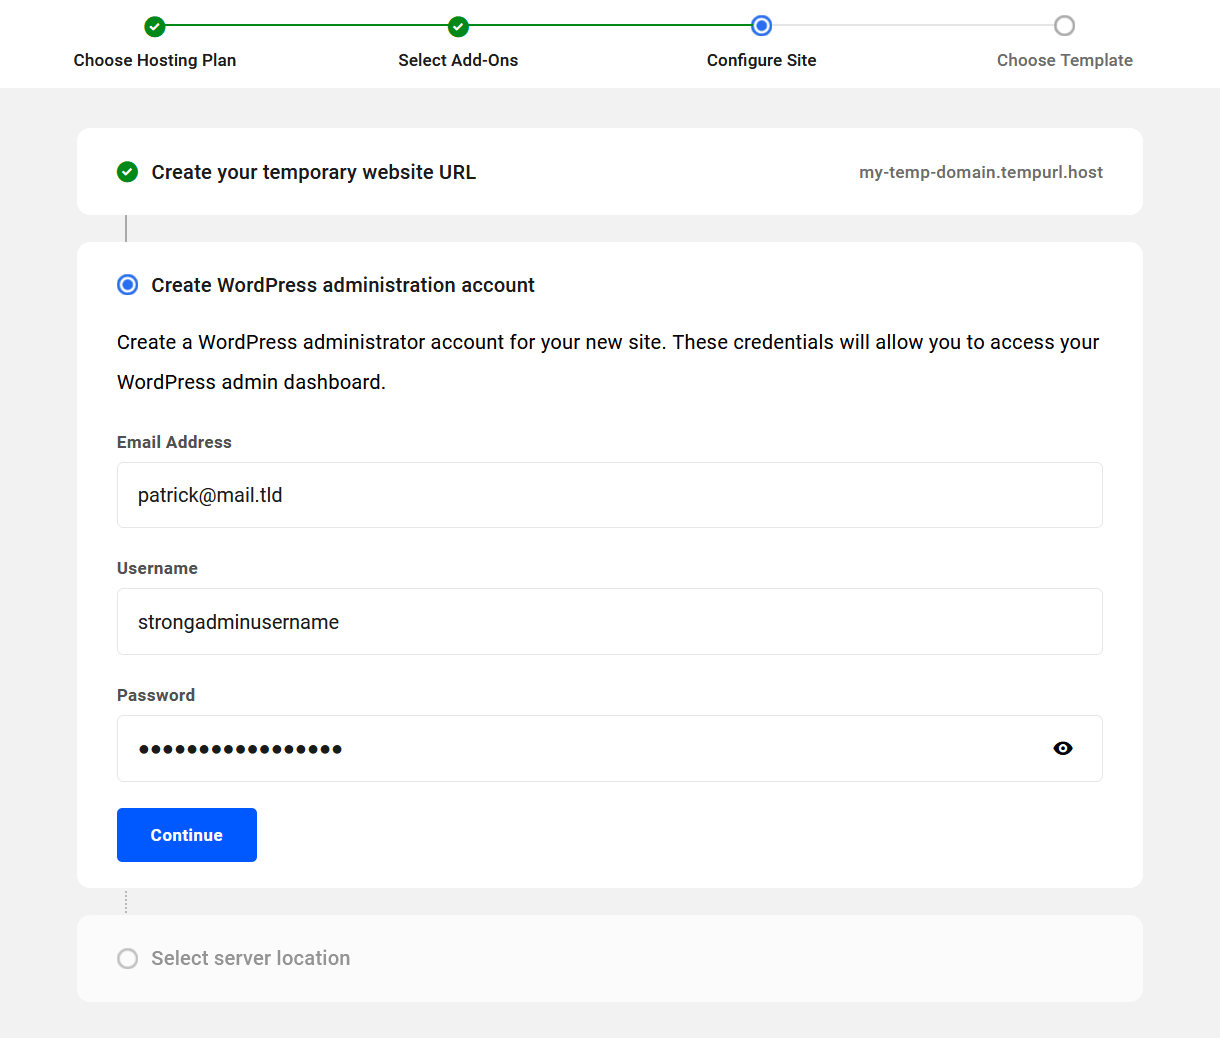
Then enter the credentials you’d like to use for your WordPress administrator account for the new site, and click Continue.
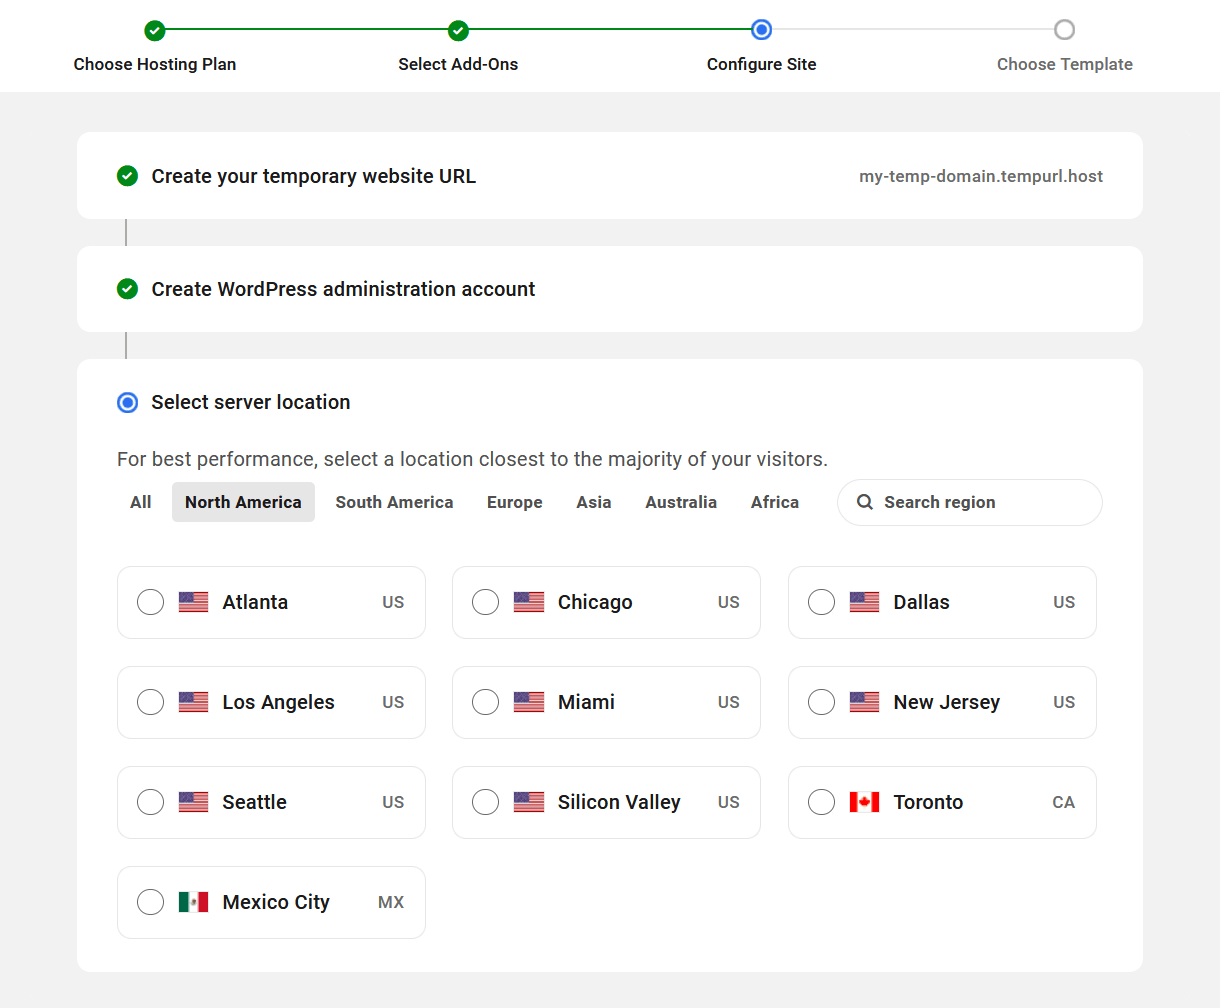
Next, choose where you would like your site hosted, and click the Continue button that will appear once you’ve done that. For best performance, select a location closest to the majority of your visitors. See the Locations & Regions chapter below for more info.
Finally, choose the site template you would like to use for your new site. You can select the blank template to create a new site from scratch, or choose one of our pre-configured WPMU DEV templates or even your own custom templates. See the Site Templates documentation for more information about how site templates work.
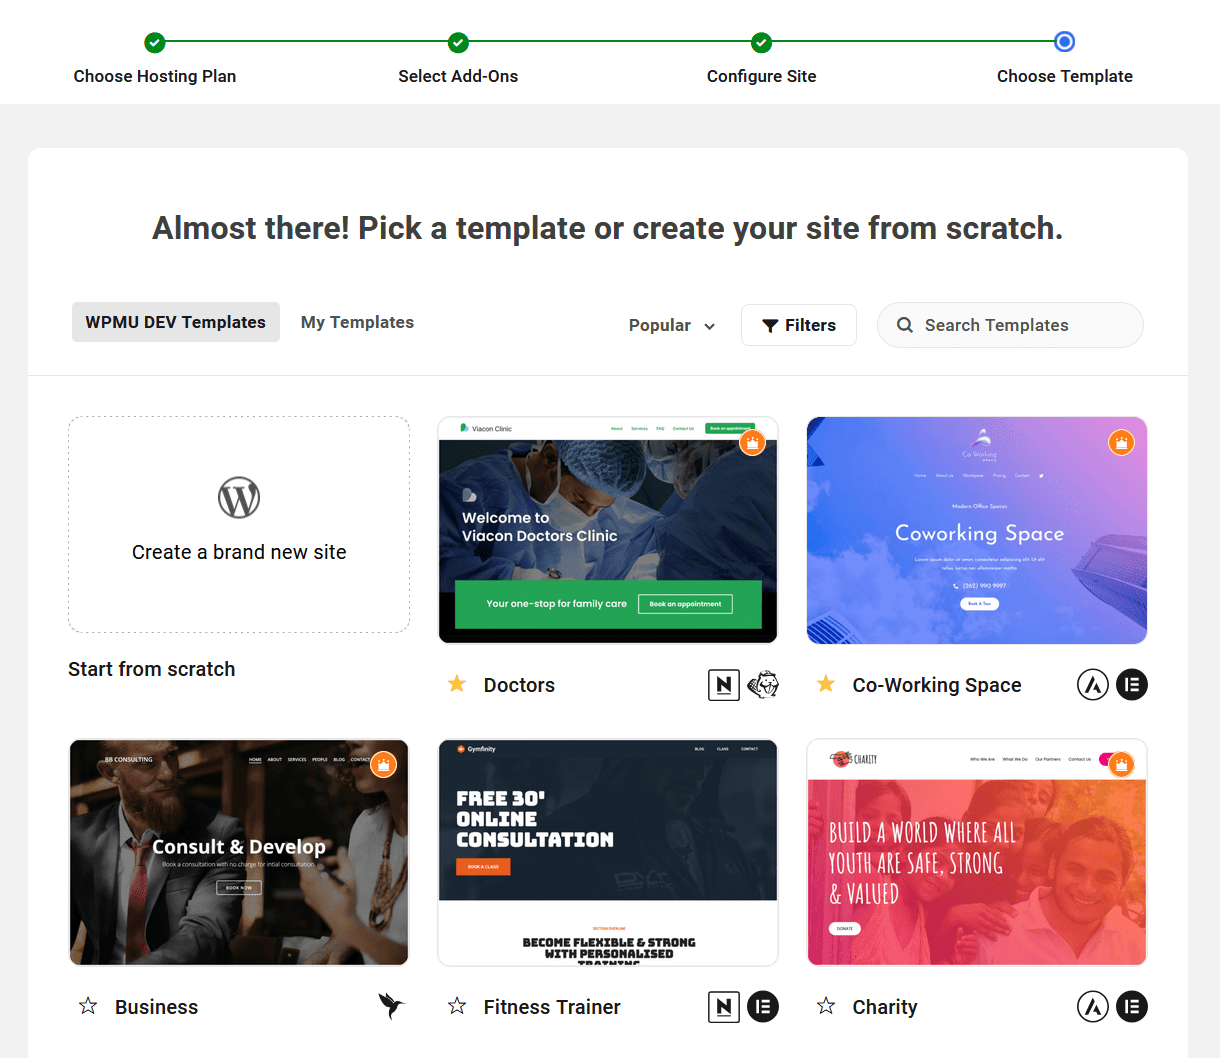
Every WPMU DEV template comes with Defender Pro, Smush Pro, Hummingbird Pro, Forminator Pro, Beehive Pro, and SmartCrawl Pro all enabled and optimized for the site. There’s a default Forminator contact form with each template as well.
If you would prefer to create sites without any of the WPMU DEV plugins installed (except of course the WPMU DEV Dashboard, which is required for all sites connected to your Hub), simply create one or more of your own custom site templates configured however you like, and use them to create your new sites.
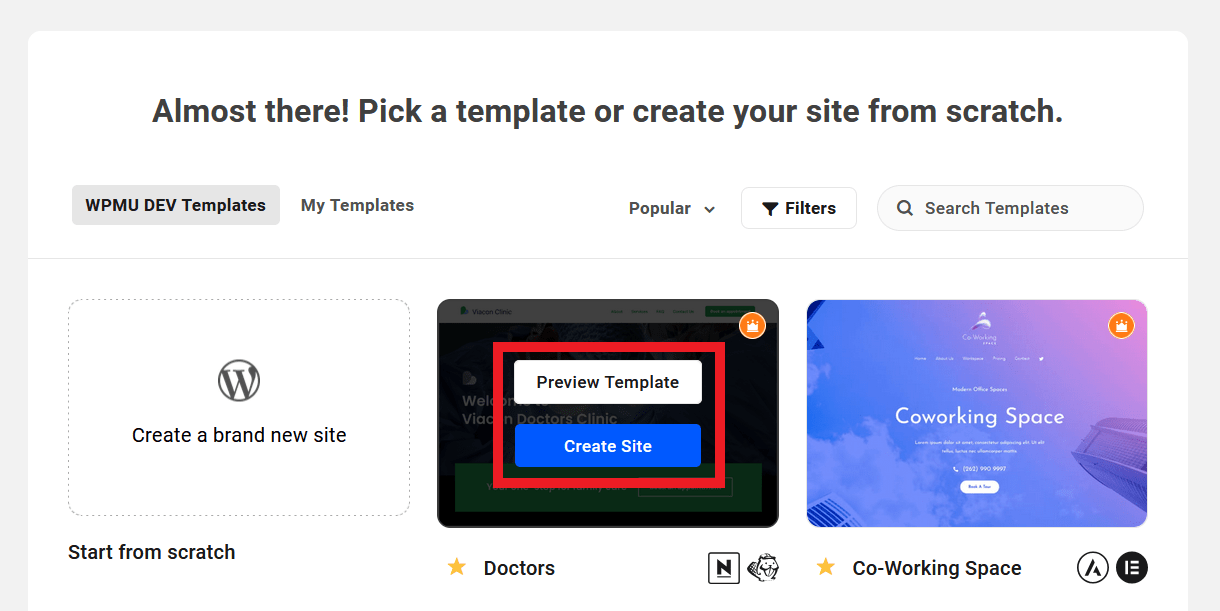
You can pop open a live preview of any WPMU DEV site template in a new tab by hovering your cursor over the template and clicking the Preview Template button (you can’t preview your custom templates though as they’re actually zipped backups. See Custom Templates FAQ for details.)
Click the Create Site button to select the template you want for your new site.
Things to Remember When Creating New Hosted Sites
- Your Temporary website URL (e.g. xxxxxx.tempurl.host) is the link you will use to access the site before you add a custom primary domain and configure its DNS records. This URL CANNOT be changed in the future. If, for any reason, you wish to access the site at a different temporary URL, you would need to create a new site and migrate the original site there.
- Your WordPress administrator user information can of course be changed in the future. Do remember the password you set in order to access the WordPress Dashboard once the site is ready. If you lose it, you can always use the Lost password feature on your site’s wp-login page to reset it.
- The Server location CANNOT be changed in the future without migrating the site and updating DNS records. The best idea is to always choose the location closest to where the majority of your site’s visitors are located.
- To prevent phishers/hackers, we do not allow any of the following to be part of temporary domains: ‘agric’, ‘securip’, ‘apple’, ‘google’, ‘gmail’, ‘netflix’, ‘paypal’, ‘amazon’, ‘billing’, ‘netfix’, ‘bill-‘, ‘-bill’, ‘credit-‘, ‘dhl’, ‘-ing’
- Your temporary domain (e.g. xxxxxx.tempurl.host) has a default robots.txt file that CANNOT be overridden by any physical or virtual robots.txt file. We prevent robots and crawlers from accessing your temporary domain so search engines don’t index it. Once you add a custom primary domain to your site, you’ll be able to modify its robots.txt file.
- If you create a staging environment of your hosted site, its robots.txt file CANNOT be overridden by any means as the file rules are configured at the server level to prevent crawlers from indexing our hosted staging sites.
1.4 Migrating An Existing Site
Copy chapter anchor to clipboardSites can be migrated to WPMU DEV hosting using our migration tool or by requesting a manual migration by our hosting support team.
We recommend using the migration tool because it simplifies and accelerates the process and automatically resolves issues that occasionally interfere with a smooth migration.
Prepare to Migrate
First, as always, back up your site. Do this at your original host. It’s unlikely that the migration process will harm your site, especially when using the migration tool, but backing up is always step one when making major changes to your site.
Regardless of the migration method you choose to use, you will need your current FTP username and password. The migration tool connects WPMU DEV servers to your host’s servers via FTP, and if you request a manual migration by our team, they will need those same FTP credentials as well.
If you don’t know the FTP credentials for your existing site, they should be displayed on a screen you can access from your dashboard or control panel at your original host.
Not sure where or how to get the FTP credentials you need from your existing host? See the Getting FTP Credentials From Your Host chapter below for guidance for some popular hosts. If you cannot locate them at your host, contact your host’s support team for assistance.
If you run into any trouble, just start a live chat or create a support ticket, and our team will be happy to assist you.
1.4.1 Migrate and Get Free Hosting
Link to chapter 4Do you have sites that you want to migrate to WPMU DEV? Let us do the migration for you, and earn up to 6 months of free hosting depending on the number of sites to be migrated. And we’ll give you a free .com domain as well.
Hosting Migration Process
- Fill in the hosting migration enquiry form.
- We will review your enquiry and provide you with an offer.
- To start the migration process, we will ask you to provide us with the details we need to migrate your sites, such as your SFTP and WordPress admin credentials.
- We’ll credit your account with the amount needed for our hosting team to create your temporary domains (migration destination).
- Once you’ve checked all is good after the migration, have added your own custom domain to each site, and adjusted the domain DNS, we’ll credit your account with the amount of free hosting offered.
FAQ
How long will it take to migrate my site?
The entire migration process usually takes 24 hours to complete. It might take longer if you have a large number of sites to migrate.
Will my site be down during the migration process?
While pointing your DNS to our servers, there may be some intermittent downtime. DNS propagation can happen instantly in certain cases, but it can also take anywhere from a few minutes to a few hours.
Will my site be fully functional after the migration?
Yes, the migration should not affect your site’s functionality in any way. As your site will be migrated to a temporary URL, you will have the opportunity to check the site functionality before adding your custom domain.
Are there any limitations on the number of sites you offer to migrate?
No, we are happy to migrate any number of sites you have.
If you have more questions related to this offer, please feel free to contact our sales team.
1.4.2 Migration Tool Method (Recommended)
Link to chapter 4The WPMU DEV migration tool is a server-to-server via (S)FTP process that is much more robust than any PHP-driven (i.e., plugin) migration.
The migration tool is also far less susceptible to timeout issues than PHP. Additionally, it handles all file transfers and redefines URLs in one smooth process that doesn’t involve programs or utilities that many users seldom use. As long as the source server isn’t afflicted with FTP issues, it would take the Mario Andretti of web admins to perform a faster, safer migration.
Note that this chapter is a guide on how to automatically create a new WPMU DEV hosted site and migrate your existing 3rd-party hosted site into it.
If you already have a WPMU DEV hosted site that you want to use as the destination site for your migration, you can use the Migrate Existing Site option under the Hosting > Tools tab in your Hub instead.
Create a New WPMU DEV Site for Migration
From the My Sites overview screen, click the + Add Site button at top-right to add a new site.
Then select the Migrate option.
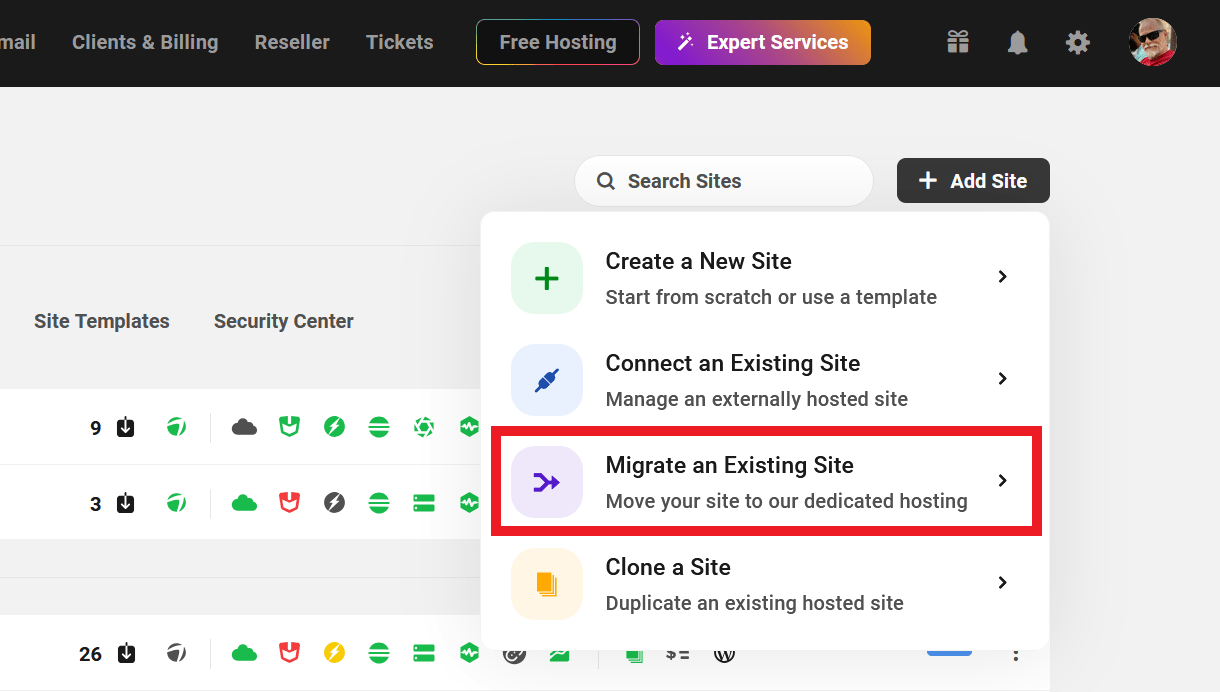
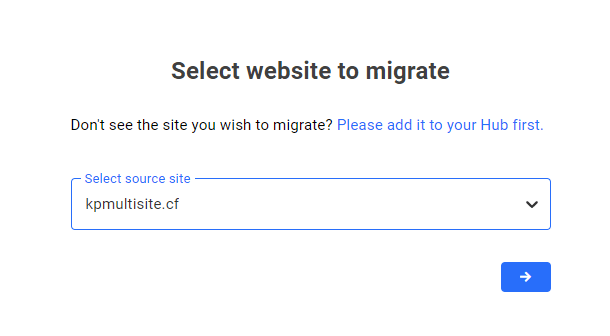
A modal window will pop open where you’ll be prompted to select the site you wish to migrate. The dropdown will reveal a list of all the sites currently connected to The Hub. If the site you wish to migrate does not appear in the list, then it is not connected, and you should click the Please add it to your Hub first link, and follow the instructions provided.
Once the site is selected, click the arrow, then select the hosting plan you want for the site you’re migrating. Use the tabs at the top to select from among our Regular hosting plans or the more performant High Frequency plans. Then click the arrow to continue.
You can use the toggle to opt in for a yearly or monthly hosting plan. Note that with our annual hosting plans, you’ll get complimentary domain and webmail credits worth purchasing a .com domain and a year-long subscription to a webmail account at WPMU DEV.
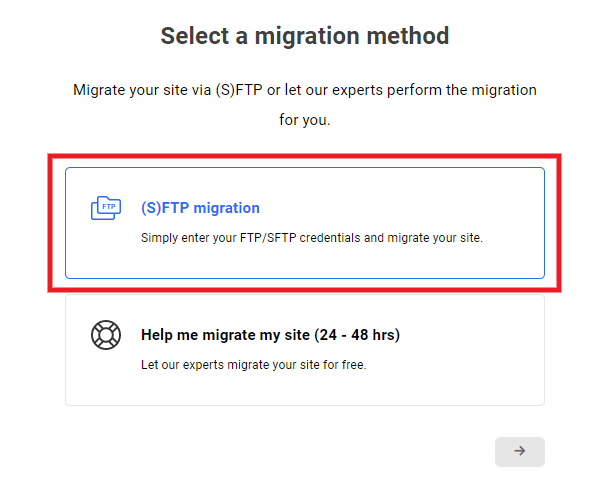
You’ll then be prompted to select the migration method you want to use. To use the migration tool, you’ll want to select the (S)FTP migration option and click the arrow to proceed.
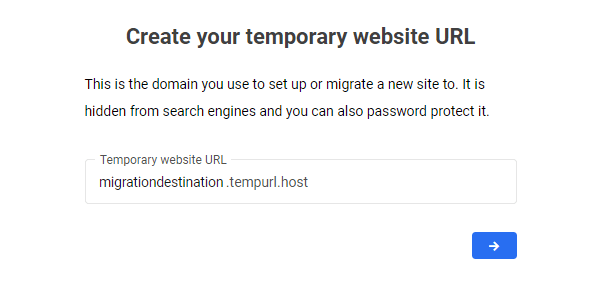
On the next screen. enter your preferred temporary domain name in the field provided, and click the arrow to proceed. Your new site will be accessible at this temporary domain until you make DNS record changes for your desired custom domain name. Learn more about pointing a custom domain name to your site in our DNS documentation.
Select the geographic region where you wish your site to be hosted.

The migration tool will then proceed to create the new hosted site that will be used as the destination for your migration. This process only takes a few minutes.

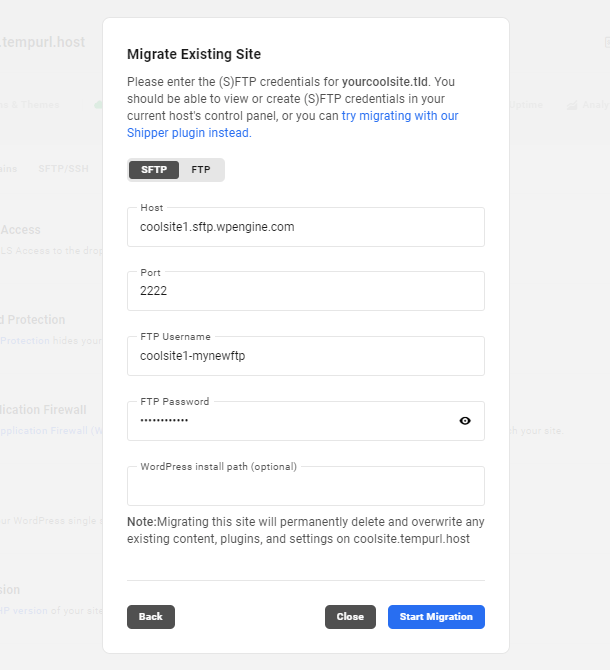
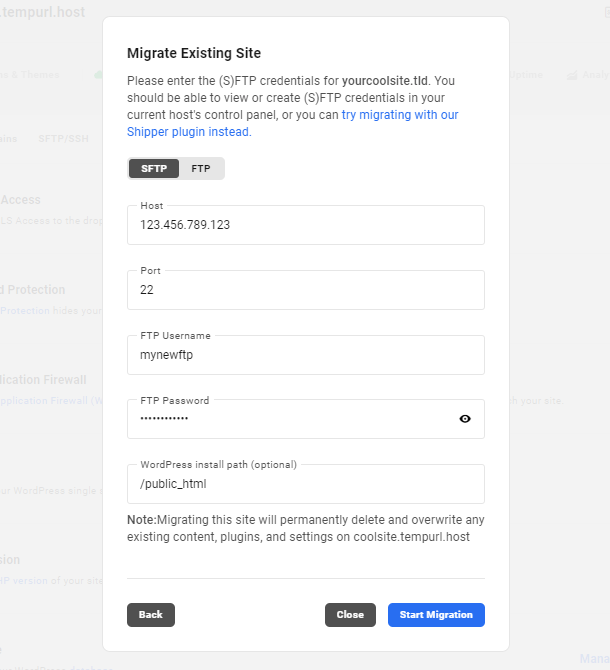
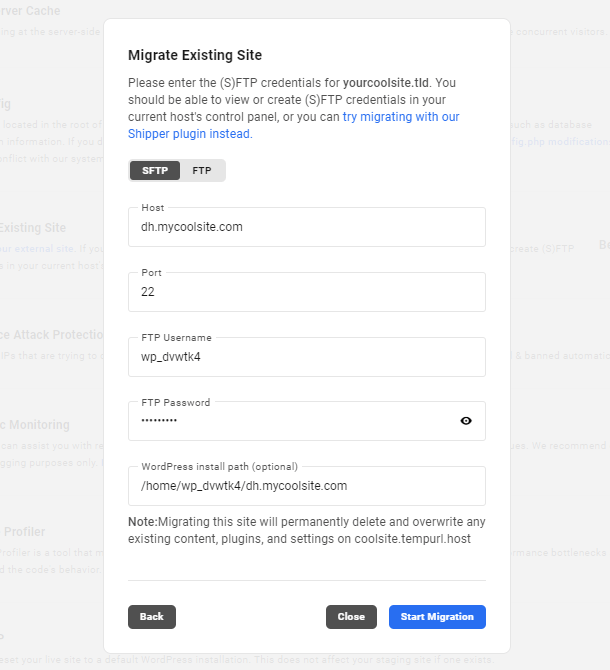
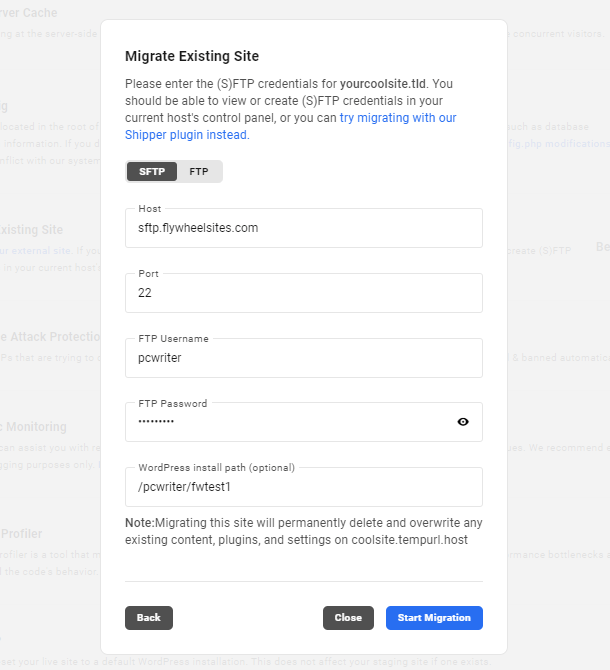
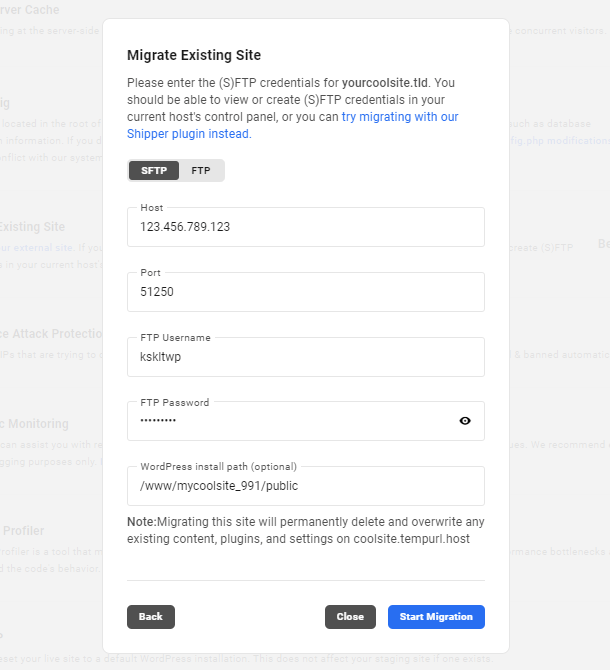
Once the site has been created, the screen will refresh and a modal window will pop open where you’ll be prompted to enter the (S)FTP credentials for the site you wish to migrate.
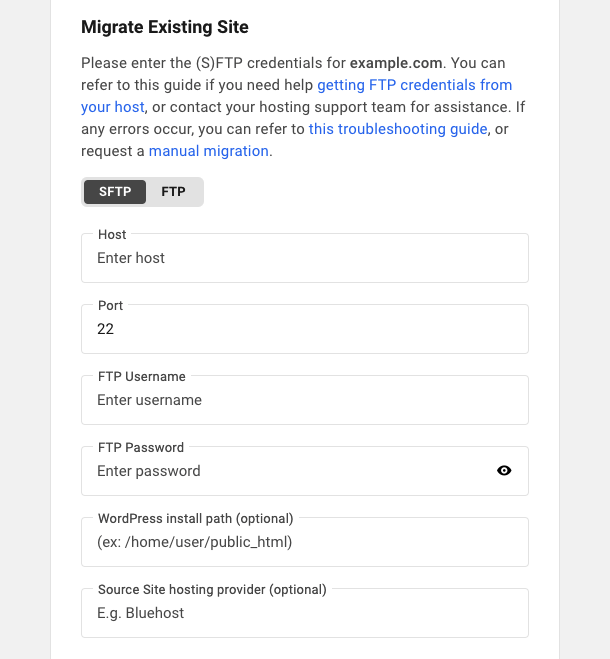
If you don’t know the (S)FTP credentials for your source site, you should find them in that site’s dashboard or control panel at your current host. If they do not exist, create them, paste them into the fields provided.
- Host – The (S)FTP hostname you use to access your site’s file system.
- Port – The port used by your host’s connection protocol..
- FTP Username – The username of a user that can access your site’s WordPress root.
- FTP Password – The password for the above user.
- WordPress install path – Once the WPMU DEV servers access your site, they will attempt to locate your site’s files, and most of the time, they have no problem doing so. Occasionally, however, the path to those files contains an unknown directory that our servers cannot resolve, and the migration may fail. If you know the FTP path to your site files, you can insert it here. You can find the install path in your site’s wp-admin in Tools > Site Health > Info > Directories and Sizes > WordPress directory location. If needed, you can also refer to the Getting FTP Credentials From Your Host chapter below for guidance on locating the install path at your host.
- Source Site hosting provider – The name of your current hosting provider (e.g., Bluehost).
Once you’ve entered all the required information, click Start Migration.

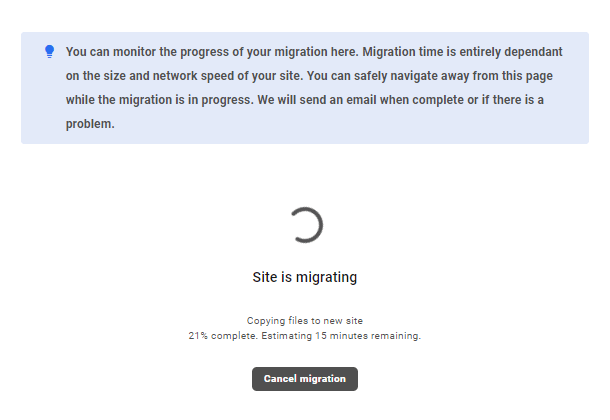
You’ll then see a progress screen like the image below where you can monitor the migration process and see an estimate of the time remaining. Note that the time it will take to complete the migration is wholly dependent on the size of your site and the speed of your existing host.
You can navigate away from this screen while the migration is in progress, and we’ll send you an email when it’s complete. If needed, you can cancel the migration by clicking the Cancel migration button.
Following a successful migration, the temporary domain used in this migration will be automatically set as the primary domain for the migrated content and is viewable. Unless the original site has been disabled in some way, your content is viewable at both the original URL and the temporary one you set for your new WPMU DEV site.
We encourage you to visit the temporary domain to verify that the migration was successful. You can do so by clicking the WP Admin option next to the temporary domain in The Hub site manager.
If the migration fails for any reason and you want to access the new site hosted here, you will need to first reset the password for the auto-created admin account. That account is created using the email address associated with your WPMU DEV account, and the default username is: admin. So to reset the password, you need only go to the /wp-login.php screen for the new site, click the Lost your Password? link, and enter your WPMU DEV email address. Click the reset link in the email, and enter the new password you want to use for the default admin account.
If you are satisfied with the migration, then it’s time to add your permanent domain name and edit your DNS records. See our WPMU DEV DNS Records documentation for guidance.
If an error occurs during site migration, look to our migration troubleshooting guide for common errors and how they can be addressed. If the issue persists, contact our support team for help.
1.4.3 Manual Migration by WPMU DEV Staff
Link to chapter 4As a WPMU DEV member, you can also request that we manually migrate your site in case the above option doesn’t work for you.
If you require the migration of a site from one WPMU DEV account to another, see Migrating a WPMU DEV Hosted Site to Another Account below.
See our post on How To Manually Migrate WordPress Sites Quickly With No Hosting Downtime to learn how our expert hosting support team can help eliminate that.
Much like the previous chapter, this is a guide on how to automatically create a new WPMU DEV hosted site, and submit a request for a manual migration of your 3rd-party hosted site into it.
If you already have a WPMU DEV hosted site that you want to use as the destination site for your migration, you can use the Migrate Existing Site option under the Hosting > Tools tab in your Hub instead.
Create a New WPMU DEV Site for Migration
From the My Sites overview screen, click the + Add Site button at top-right to add a new site.
Then select the Migrate option.
The dropdown menu on the next screen will reveal a list of all the sites currently connected to The Hub. If the site you wish to migrate does not appear in the list, then it is not connected, and you should click the Please add it to your Hub first link, and follow the instructions provided. Once the site is connected, select it from the dropdown menu and click the arrow to proceed.
Once the site is selected, click the arrow, then select the hosting plan you want for the site you’re migrating. Use the tabs at the top to select from among our Regular hosting plans or the more performant High Frequency plans. Then click the arrow to continue.
You can use the toggle to opt in for a yearly or monthly hosting plan. Note that with our annual hosting plans, you’ll get complimentary domain and webmail credits worth purchasing a .com domain and a year-long subscription to a webmail account at WPMU DEV.
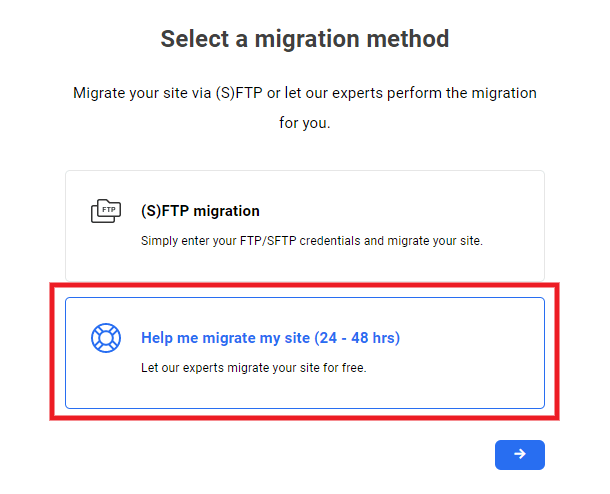
You’ll then be prompted to select the migration method you want to use. To request a manual migration by our hosting support team, you’ll want to select the Help me migrate my site option and click the arrow to proceed.
On the next screen. enter your preferred temporary domain name in the field provided, and click the arrow to proceed. Your new site will be accessible at this temporary domain until you make DNS record changes for your desired custom domain name. Learn more about pointing a custom domain name to your site in our DNS documentation.
Select the geographic region where you wish your site to be hosted.
The migration tool will then proceed to create the hosted site that will be used as the destination for your migration. This process only takes a few minutes.
Once the site has been created, the screen will refresh and a modal window will pop open where you’ll be prompted to provide access credentials for the site you wish to migrate.
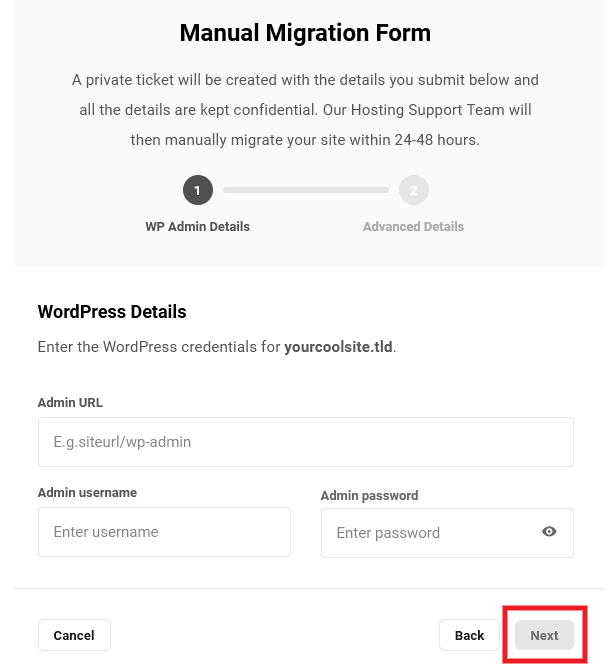
WordPress Details
Enter the required information so the hosting support team can access your source site, then click the Next button:
- Admin URL – Enter the URL to the admin area of your site, without the protocol (http/https).
- Admin username – The username of an administrator user on that site.
- Admin password – The password for the above user.
On the next screen, you’ll be prompted to provide either login credentials to your Hosting control panel and/or (S)FTP/SSH details. The hosting support team needs at least one of these to migrate your site, but if you can provide both, that would be ideal. Select the appropriate option and enter the required information.
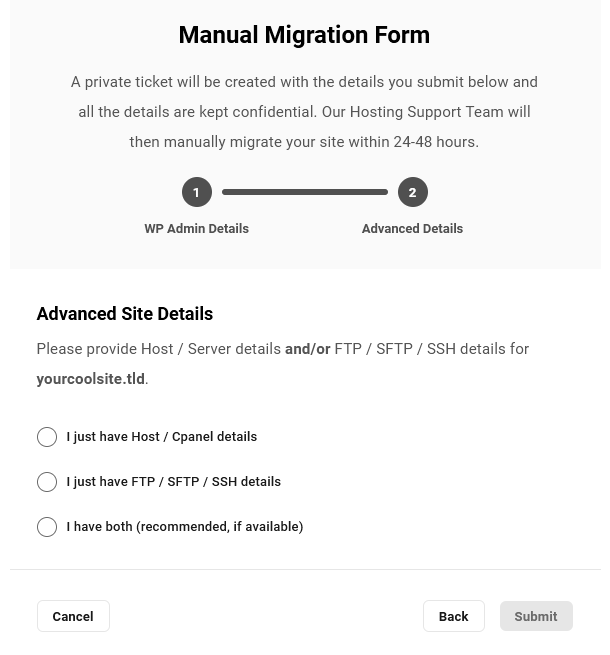
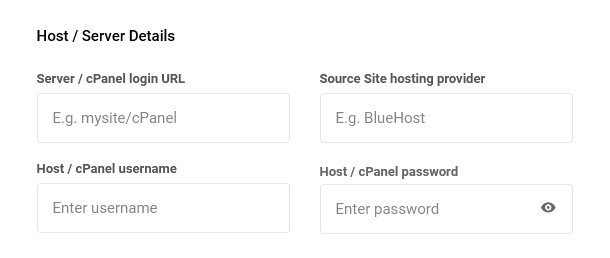
Host / Server Details
- Server / cPanel login URL – The URL needed to access the control panel for your site at your 3rd-party host.
- Source Site hosting provider – The name of your current hosting provider.
- Host / cPanel username – The username you use to login to your site’s control panel.
- Host / cPanel password – The password for the above user.
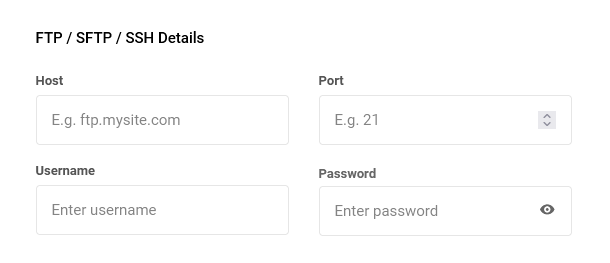
FTP / SFTP / SSH Details
- Host – The hostname you use to access your site’s file system, for ex: ftp.mysite.com
- Port – The port used by your host’s connection protocol.
- Username – The username of a user that can access the root of the WordPress install.
- Password – The password for the above user.
Optionally provide any other information that may be needed to access the file system of the site you want to migrate. For example, if you have multiple sites installed in the same directory, provide the server path here so our team knows which one to migrate.
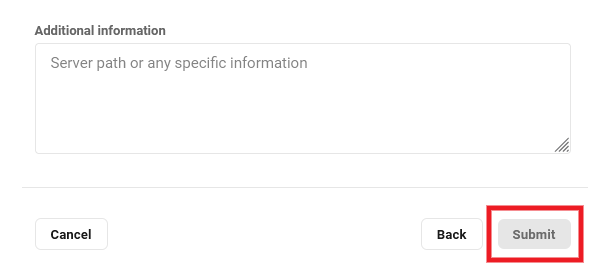
Once you have provided all the required and any optional information in the form, click the Submit button to submit your request.
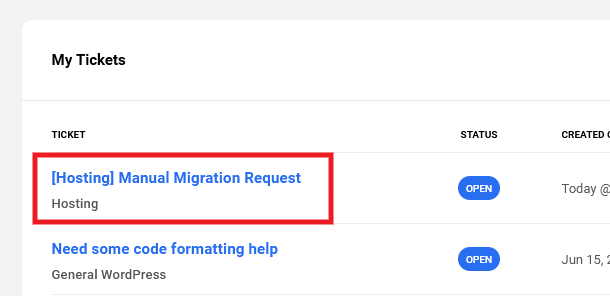
A confirmation notice will appear on screen to inform you that your request has been successfully submitted.
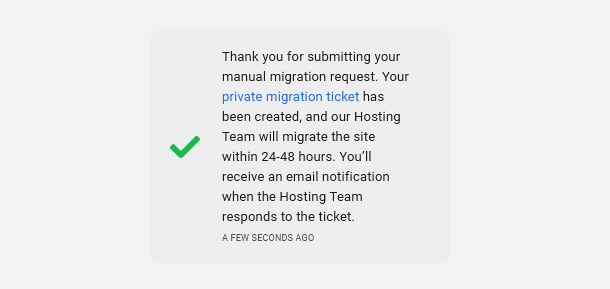
The notice contains a link to the private support ticket that is automatically created for you in the Hosting Support forum. All the information that you provided in the form is available only to the hosting support team in a private task linked to that ticket.

If the notice closes before you have a chance to click on the ticket link, you’ll find it listed in the My Tickets section of the Support area in your Hub.
The hosting support team will be notified of your request and will proceed with the manual migration of your site within 24-48 hours. As soon as they reply on your ticket, with confirmation that the migration has been completed or if they require more information, you’ll receive an email notification of their reply.
That email will contain a link back to your ticket where you can reply if needed. Please do not reply directly in the email itself.
Supported Migrations & Conversions
It’s important to note that some types of migrations are out-of-scope and cannot be handled by our support or hosting staff. Following are the types of manual migrations/conversions that we can and cannot do for you.
- Supported migrations
- Yes – If Single site -> Single site
- Yes – If Multisite -> Multisite
- Supported conversions
- Yes – If Single site -> Multisite
- Yes – If Subsite -> Single site (you should expect to need to perform some cleanup in the converted site, and there may be configuration issues for some plugins due to conversion)
- Depends – If Multisite -> Single site (supported only if there’s just a main site, without subsites)
- Depends – If Subdomain -> Subdirectory (supported only if there’s just a main site, without subsites)
- Depends – If Subdirectory -> Subdomain (supported only if there’s just a main site, without subsites)
- Depends – Backups made using the All-in-One Migration plugin that creates archives using .wpress format should be avoided as we can’t guarantee that we can fully extract them.
- Not supported – Out of scope
- No – If Single -> Subsite (3rd party developer required for this type of migration)
- No – If Subsite -> Subsite (3rd party developer required for this type of migration)
1.4.4 Migrating a WPMU DEV Hosted Site to Another Account
Link to chapter 4It is possible to migrate a WPMU DEV hosted site from one account to another, but it is a manual process that can only be done by our accounts and hosting support teams.
For this type of migration, you would not use the Migrate an Existing Site option as noted in the previous two chapters. That option only works if the source site is already connected to the same Hub account as the destination site, which is not the case here.
Instead, you would start a live chat support session in your Hub, and specify that you would like to migrate a WPMU DEV hosted site from one account to another.
The live chat support agent will collect all the necessary information from you, and will open a private ticket for you in the Hosting Support forum. The agent will also ensure that our accounts team is notified of your request.
The accounts team will ensure that both parties approve the transfer of ownership of the site.
Our hosting support team will then proceed with the migration of the site, and you will be kept informed of progress or obstacles in the support ticket created for you.
Things to do after migration
Once the migration has been completed, you will have a few things to do:
- Verify that the migrated site is performing as expected in the new account.
- Remove each domain that you want to continue using for the site from the Hub of the old account. See our Hosting > Domains documentation for help if needed.
- Then follow the steps in the Go Live Checklist above for the new site.
- Finally, download the most recent backup of the old site for safekeeping and, unless you want to keep it, delete the old site from the old account before its renewal date so you’re not charged for it again.
1.5 Cloning a Site
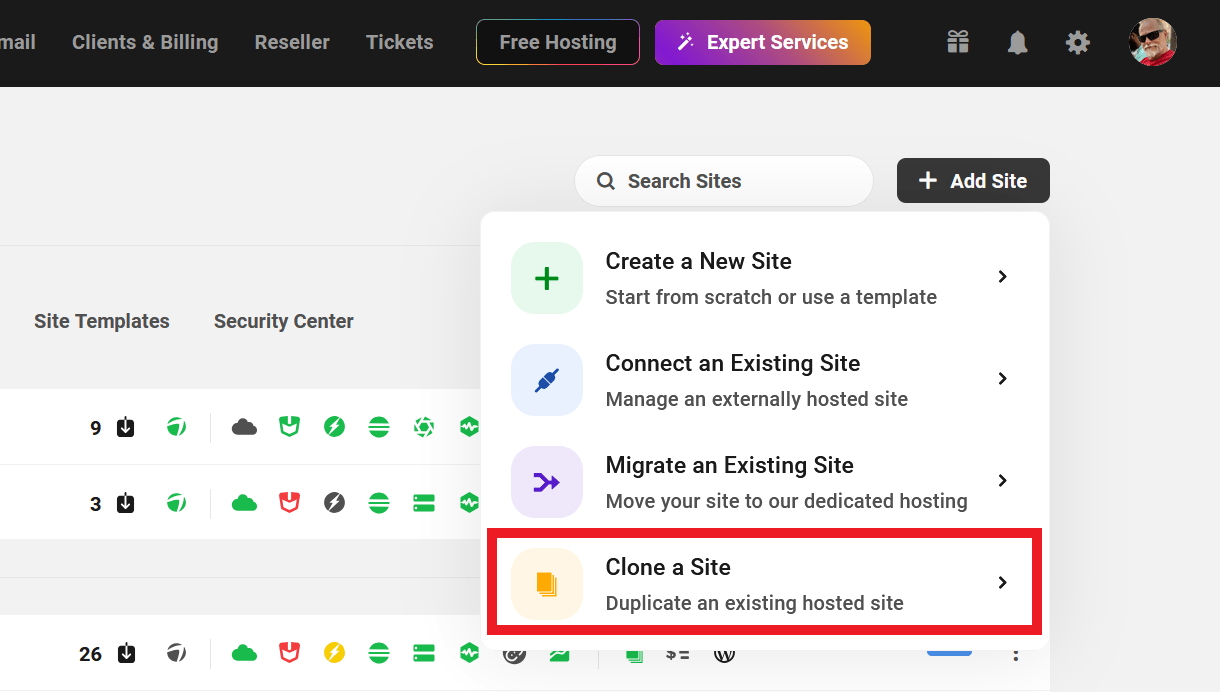
Copy chapter anchor to clipboardThe cloning tool can be used to duplicate any WPMU DEV hosted site. You can access the tool on the My Sites screen by clicking the + Add Site button and selecting the Clone a Site option:
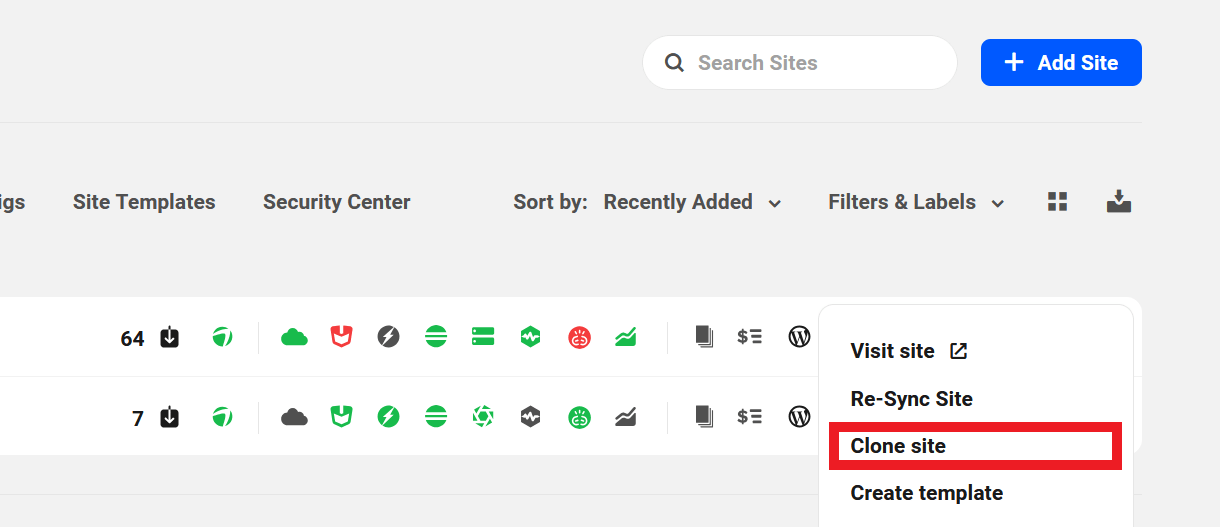
Or select Clone Site in the site options menu for any hosted site on the My Sites screen:
Cloning generates an exact copy of a site in a new WordPress installation, including themes, plugins, content, site settings and database. Cloning does not copy domains, SFTP/SSH users, or staging configurations.
Cloning can also be used to move a site’s hosting location from one geographic region to another. See Migrate a Site to a New Region below for more info.
Note that you cannot select a different hosting plan when cloning an existing site; the clone will be automatically created on the same hosting plan as the original. If you do need to clone to a different hosting plan, you can first create a custom Site Template from the site, then create a new site from that template instead.
When cloning a site, please be sure to review Things to Remember When Creating New Hosted Sites above.
Please note that the cloning feature is not available to Free Hub users. See Free Hub Restrictions for details.
The first step of the cloning process will prompt you to confirm which site you want to clone.
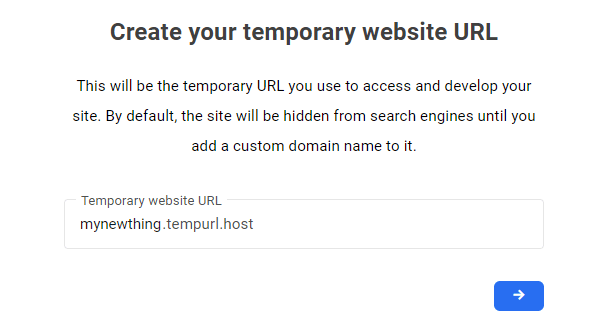
The cloned site will reside temporarily on a tempurl.host domain, which can be replaced later with a permanent domain. Enter the temporary domain name you prefer into the field provided, and click the blue arrow to proceed.
Next, use the drop-down menu to select where you would like the new site to be hosted, geographically. We recommend choosing a location as close as possible to your primary audience in order to minimize distance-related performance issues.
When ready, click the blue arrow to proceed and the cloning process will begin. The time required to clone a site relies entirely on the size of the site. Some sites may take only a few minutes, while others may take hours. Either way, the site admin will receive an email notification when the new site is ready.
Once the cloning process is complete, see our Adding Domains guide to add the new site’s permanent domain.
1.5.1 Migrate a Site to a New Region
Link to chapter 5If you wish to migrate an existing site to a different hosting region, using the Cloning feature is the simplest way to get that done.
Start by following the instructions in the Cloning a site chapter above and, when you get to the Server Location step, select the new region where you’d like your site to be located.
Once the site has been cloned, take some time to verify that everything works as expected on the new cloned site.
When you’re satisfied that all is well on the new cloned site, go to the Domains tab of the original site in your Hub, and delete your domain name from there. Then go to the Domains tab of the new cloned site, and add the domain name to the new site.
Then adjust the DNS settings of the domain name to point it to the new cloned site.
Finally, once both DNS and SSL check green in your Hub for the new cloned site, delete the old original site. Done.
See the Domains documentation for more info on domains and DNS.
Does it cost me anything to move the site like this?
That really depends on how much time you take between creating the new cloned site and deleting the old original site.
For example, let’s say you want to move a site that is currently costing you $12/month, and you clone it on the 1st day of the hosting billing cycle for that site.
The new cloned site would create an additional hosting instance on the same plan as the original, and you would incur an additional charge of $12/month for that new site.
If you delete the original site after taking a couple of days to verify the cloned site, your account would be credited a pro-rated amount for the remaining time in the current billing cycle of the original site. So the above example would actually cost you only 2 days of hosting for the original site (about $0.80).
Here are a few examples to give you a better idea of how pro-rating hosting credits would work:
Scenario A:
- You pay for site A – day 1/30.
- You clone it to site B on day 5 of site A’s billing cycle.
- If you delete site A minutes after cloning it, you would get 30-5 days of pro-rated account credits.
Scenario B:
- You pay for site A – day 1/30.
- You clone it to site B on day 5 of site A’s billing cycle.
- You then wait until day 15 to delete site A. You would get 30-15 days of pro-rated account credits.
Scenario C:
- You pay for site A – day 1/30.
- You clone it to site B on day 5 of site A’s billing cycle.
- You then wait until day 29/30 to delete site A. You would get 30-29 days of pro-rated account credits.
See How WPMU DEV Hosting Credits Work for more info on hosting credits.
1.5.2 Troubleshooting Cloning
Link to chapter 5Analytics
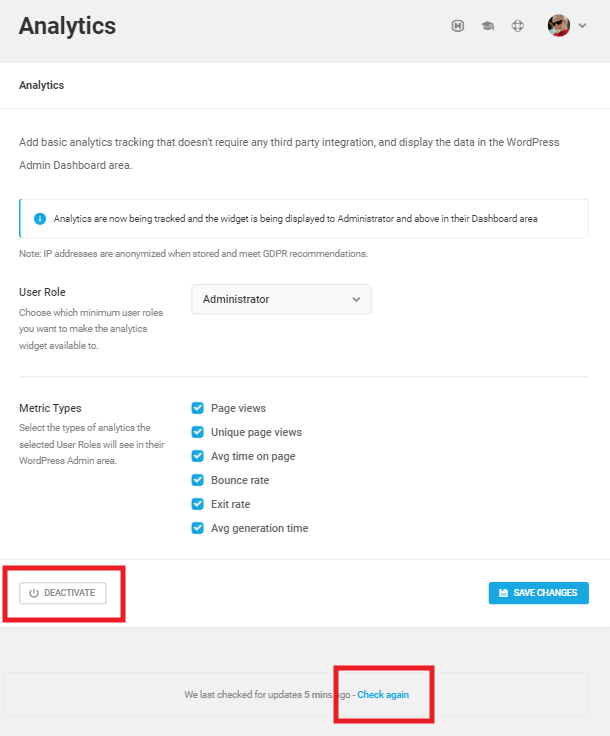
If you had the Analytics feature enabled in the WPMU DEV Dashboard on the original site, you may see those same statistics appear on the cloned site as well.
To fix this possible issue and reset stats for the cloned site, simply deactivate the Analytics feature in the WPMU DEV Dashboard on the cloned site. Then click the “Check again” link in “We last checked for updates [x] hours/mins/seconds ago – Check again” at the bottom of the screen.
Once you reactivate the Analytics feature, the stats will be fresh and relevant to only the cloned site.
Database
Note that when cloning a site, the database name of the new site will be identical to the original site’s database name, and cannot be changed.
This is by design as some sites might have huge databases, and “renaming a database” function doesn’t exist in phpMyAdmin. So to have a new database name on the cloned site, the process would be export, create new, import, delete old. That process could create disk space issues and could break at any point, so we decided to just transfer everything “as is” to the new cloned site.
This should not be an issue at all as each hosted site is a totally separate hosting instance, and the new database of the new cloned site would be tied to only that site.
1.6 Deleting a Site
Copy chapter anchor to clipboardA WPMU DEV hosted site can be deleted for any of the following reasons:
- Automatically via CRON – If a site that you created with hosting credits is unused, it gets automatically archived after 21 days, as noted in the About Free Sites chapter above.
- Deleted manually – You are free to delete any of your sites at any time. If you delete a site before its current billing period has elapsed, an amount pro-rated for that remaining time will be refunded to you in the form of account credits.
- WPMU DEV membership expired – If your membership at WPMU DEV expires, your hosted sites would also expire. Note that our system will attempt charges for 21 days and site(s) would expire after that period if the membership or hosting plan is not renewed within that time.
When a site is deleted, all content, including plugins, themes, database and settings, is removed from both the production and staging environments (if one exists).
Existing hosting backups are retained for a period of 30 days to restore if needed. See Restoring a Deleted Site below for details.
However, please note that staging environments are not included in hosting backups, so are permanently deleted and cannot be restored. See our Hosting > Backups documentation for more information.
1.7 Restoring a Deleted Site
Copy chapter anchor to clipboardIf you wish to restore a deleted site, the process is quite simple but it must be done within 30 days from the time it was deleted.
- Create a site while logged-in with the same WPMU DEV account, using the same temporary tempurl.host name & region as the original site.
- You’ll then see the backups of the original site available under the Hosting > Backups tab. Restore one of the available backups within 30 days, and your site will be live again.
Note that although you recreate the site with the same name and in the same region, it may be assigned a new IP address. So if you are using A & AAAA records instead of a CNAME record in your DNS setup, you’d want to check the DNS records of your site and update the A & AAAA records so they point to the new IP address.
Restoration Failed?
When restoring your site, we’ll first use any account credits you may have (for example, credits that may have been issued as a refund when you deleted a site) and then pro-rate charge the balance to the payment method you have on record with us. If the site restoration fails for any reason, the charged amount will be immediately refunded to your payment method.
1.8 Getting FTP Credentials From Your Host
Copy chapter anchor to clipboardThis chapter provides guidance on how to get or create the FTP credentials from your existing 3rd-party host. These credentials are needed so you can proceed with the migration tool in your Hub, or with a request for manual migration by WPMU DEV support staff.
Guidance is provided for some of the more popular hosts & hosting interfaces below. If you don’t see your host listed here, check some of the existing ones to see if they can help, or start a chat with our support superheroes for assistance.
1.8.1 cPanel
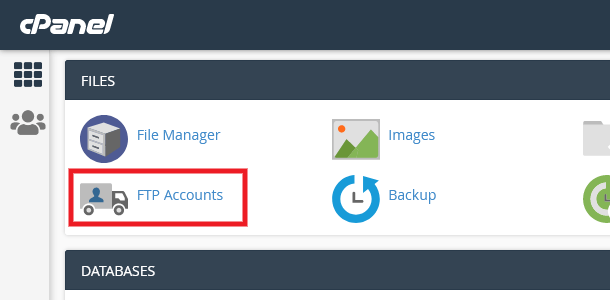
Link to chapter 8Follow this guide to get FTP credentials for any host that uses the popular cPanel interface.
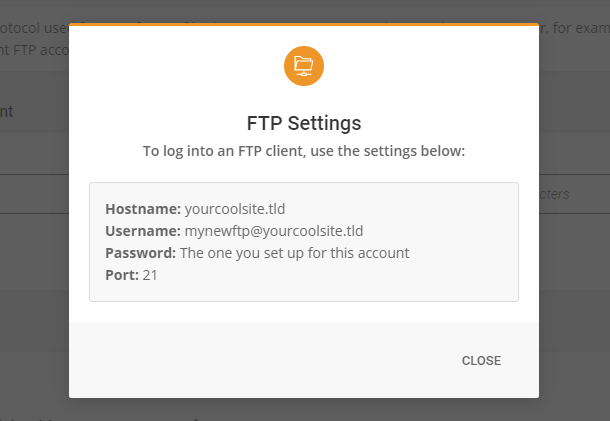
Once logged into your cPanel, scroll down to the Files section, and click on FTP Accounts.
If there is not already an FTP user available for which you know the password, you can simply create a new one for your migration.
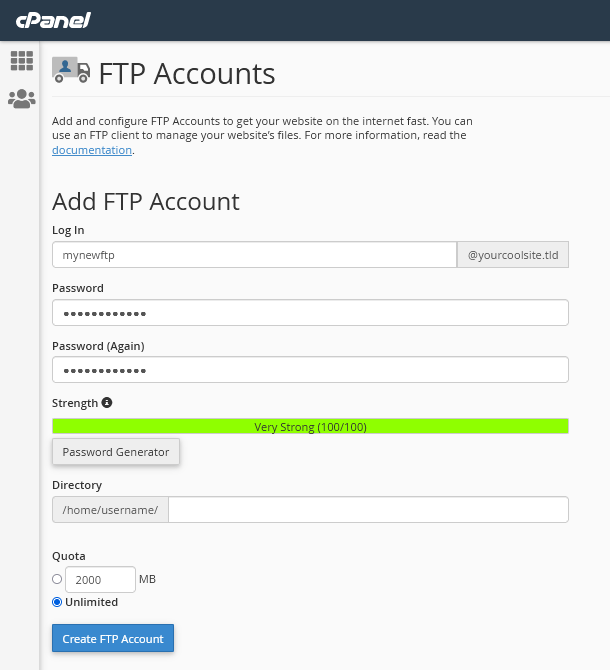
- Log In – Enter the username you want for this FTP user
- Password – Enter the secure password you want to use for this FTP user. You’ll want to take note of your chosen password for later use as it will not be displayed once the account is created.
- Directory – IMPORTANT: Be sure to delete what the system adds in this field so the new user has full access to your site’s root directory.
- Quota – Should be set to Unlimited.
Once you’ve entered all the information as above, click the Create FTP Account button.
You’ll then see the new FTP account you just created in the FTP Accounts list just beneath the form you just submitted.
Click the Configure FTP Client link for the account you just created to pop open the Manual Settings section where you’ll see the info you need.

If you are requesting a manual migration, you would provide the needed info as described in the Manual Migration by WPMU DEV Staff chapter above.
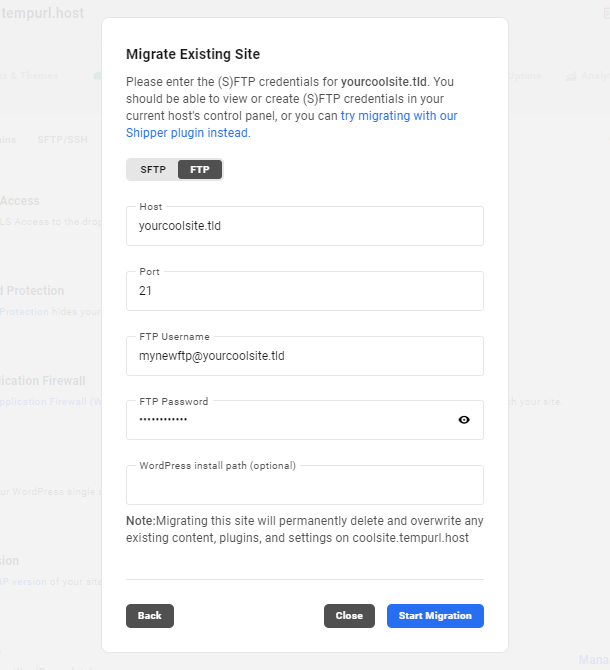
If you are migrating your site using the Migration Tool in your Hub, enter the FTP information in the Migrate Existing Site modal window as follows:
- Select the SFTP or FTP option for the protocol according to the protocol used by your host.
- The FTP Server shown here is what you would enter for the Host.
- The Port should be set according to the protocol used by your host: 21 for plain FTP, 22 for secure SFTP.
- Leave the WordPress install path blank (this is why you ensured the Directory was blank when you created the FTP account as above).

Once all the FTP information has been added in the Migrate Existing Site modal, click the Start Migration button. The time it takes to complete will depend on the size of the site you’re migrating.
1.8.2 SiteGround
Link to chapter 8Follow this guide to get FTP credentials for your SiteGround hosted site.
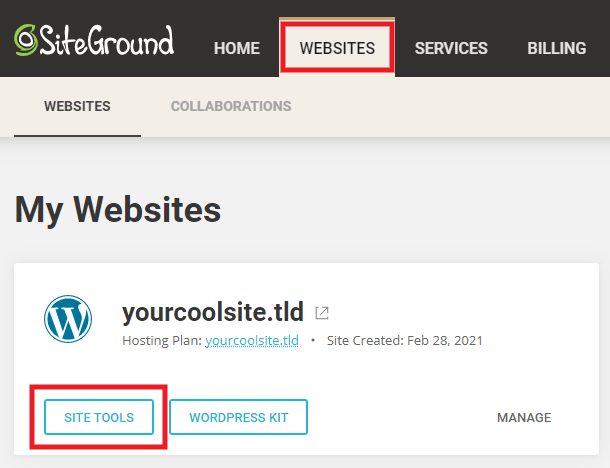
Once logged into your SiteGround account, click the Websites link in the main navigation. Then click the Site Tools button for the site you want to migrate.
In the sidebar on the next screen, click the FTP Accounts option from the Site menu. If there is not already an FTP user available there for which you know the password, you can simply create a new one for your migration.
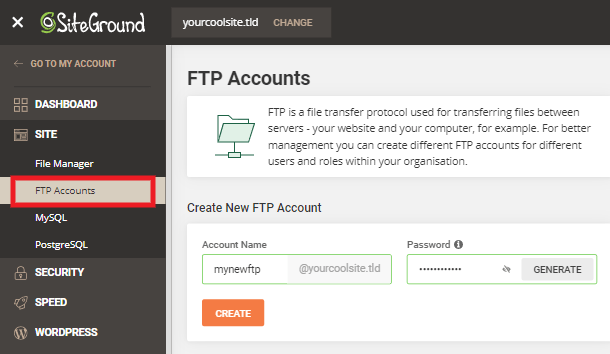
- Account Name – Enter the username you want for this FTP user
- Password – Enter the secure password you want to use for this FTP user. You’ll want to take note of your chosen password for later use as it will not be displayed once the account is created.
Once you’ve entered the information as above, click the Create button.
You’ll then see the new FTP account you just created in the Manage FTP Accounts list just beneath the form you just submitted.
Click the vertical ellipsis icon to pop open management options for the FTP account.
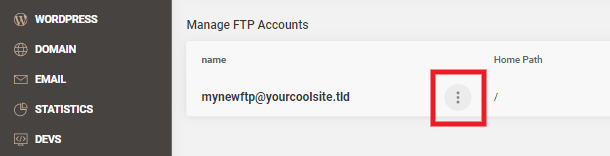
In the contextual menu that slides open at the bottom of the screen, click the FTP Credentials option.

That will pop open a little modal window with the FTP Settings info you need.
If you are requesting a manual migration, you would provide the needed info as described in the Manual Migration by WPMU DEV Staff chapter above.
If you are migrating your site using the Migration Tool in your Hub, enter the FTP information in the Migrate Existing Site modal window as follows:
- Select the SFTP or FTP option for the protocol according to the protocol used by your host.
- The Hostname shown here is what you would enter for the Host.
- The Port should be set according to the protocol used by your host: 21 for plain FTP, 22 for secure SFTP.
- Leave the WordPress install path blank so the tool can connect to your WordPress root.
Once all the FTP information has been added in the Migrate Existing Site modal, click the Start Migration button. The time it takes to complete will depend on the size of the site you’re migrating.
1.8.3 WP Engine
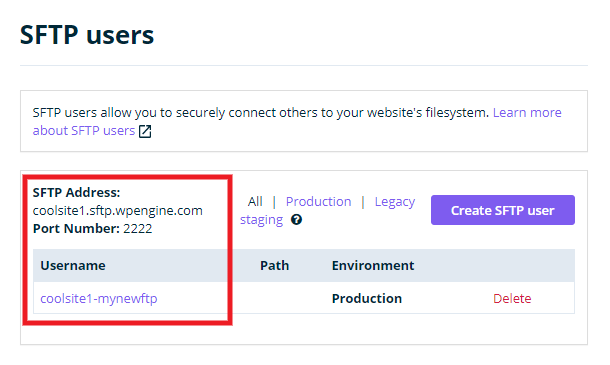
Link to chapter 8Follow this guide to get SFTP credentials for your WP Engine hosted site.
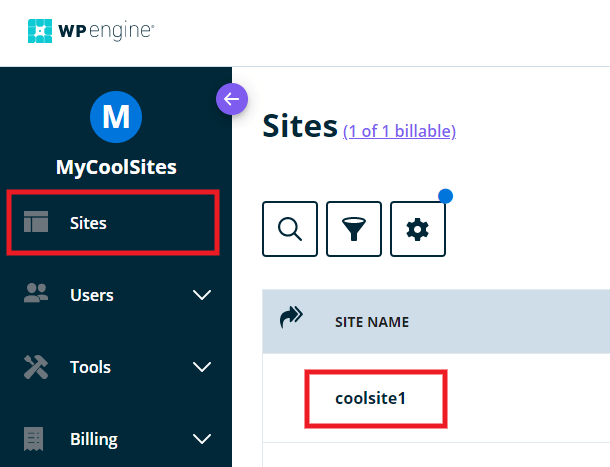
Once logged into your WP Engine account, navigate to the Sites screen and click on the name of the site you want to migrate.
Next, in the Production menu, click the SFTP users option.

If there is not already an SFTP user available there for which you know the password, you can simply create a new one for your migration. In the SFTP users section, click the Create SFTP user button.
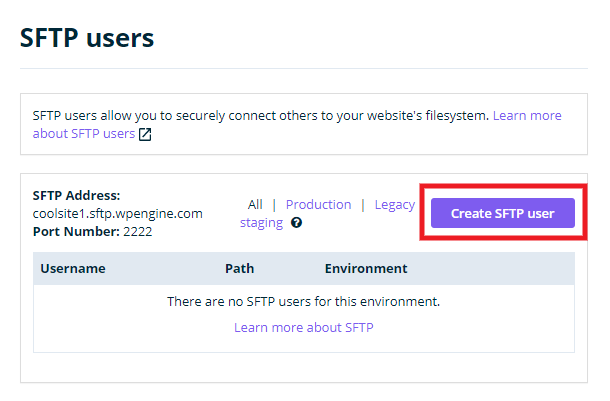
That will pop open a modal window with the new SFTP user creation form.

- Username – Enter the username you want for this SFTP user
- Password – Enter the secure password you want to use for this SFTP user. You’ll want to take note of your chosen password for later use as it will not be displayed once the account is created.
- Path (optional) – Leave this blank.
- Environment – Be sure to select your Production environment to migrate your actual site.
Once you’ve entered the information as above, click the Add SFTP user button.
You’ll then see the new FTP account you just created in the area beneath the Create SFTP user section where all the info you need is displayed.
If you are requesting a manual migration, you would provide the needed info as described in the Manual Migration by WPMU DEV Staff chapter above.
If you are migrating your site using the Migration Tool in your Hub, enter the FTP information in the Migrate Existing Site modal window as follows:
- Select the SFTP option for the protocol.
- The SFTP Address shown here is what you would enter for the Host.
- The Port should be set according to the protocol used by your host: Wp Engine uses port 2222.
- Leave the WordPress install path blank so the tool can connect to your WordPress root.
Once all the FTP information has been added in the Migrate Existing Site modal, click the Start Migration button. The time it takes to complete will depend on the size of the site you’re migrating.
1.8.4 Cloudways
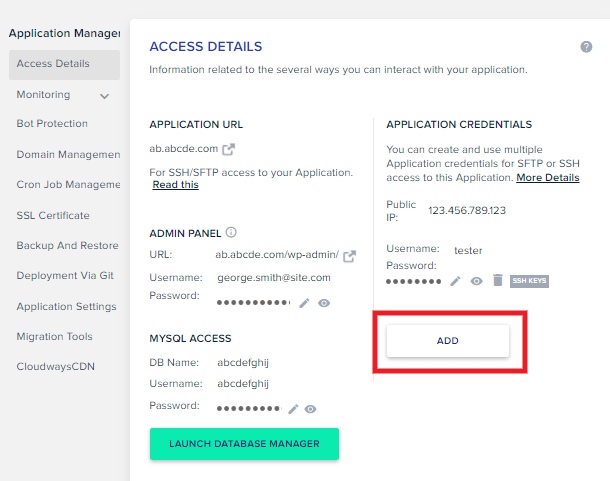
Link to chapter 8Follow this guide to get SFTP credentials for your Cloudways hosted site.
Once logged into your Cloudways account, be sure you are viewing the Applications screen, not the Servers screen. You do not want to use an SFTP user for your entire server, as using such a user would migrate everything on the server to WPMU DEV. You only want to migrate one site.
On the Applications screen, click on the site (Application) that you want to migrate.

If there is not already an SFTP user available for that site for which you know the password, you can simply create a new one for your migration.
In the Access Details section of your Application, click the Add button under Application Credentials.
That will pop open a modal window with the new SFTP user creation form.
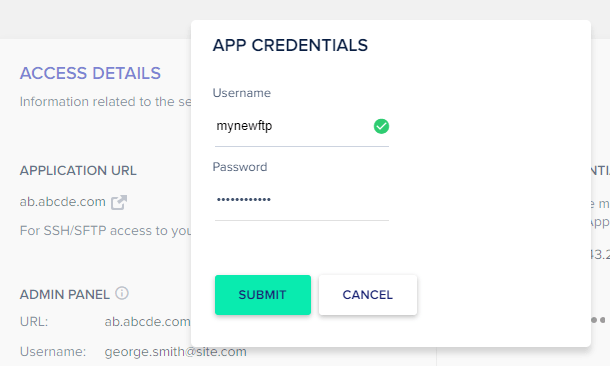
- Username – Enter the username you want for this SFTP user
- Password – Enter the secure password you want to use for this SFTP user.
Once you’ve entered the information as above, click the Submit button.
You’ll then see the new SFTP account you just created in the Application Credentials area where all the info you need is displayed.
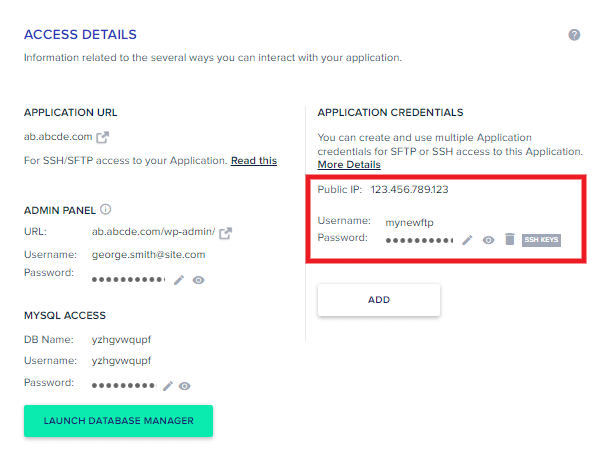
If you are requesting a manual migration, you would provide the needed info as described in the Manual Migration by WPMU DEV Staff chapter above.
If you are migrating your site using the Migration Tool in your Hub, enter the FTP information in the Migrate Existing Site modal window as follows:
- Select the SFTP option for the protocol.
- The Public IP shown here is what you would enter for the Host.
- The Port should be set according to the protocol used by your host: Cloudways uses port 22.
- The WordPress install path should be set to /public_html so the tool can connect to your WordPress root.
Once all the FTP information has been added in the Migrate Existing Site modal, click the Start Migration button. The time it takes to complete will depend on the size of the site you’re migrating.
1.8.5 GoDaddy Managed WordPress
Link to chapter 8If you have any hosting plan at GoDaddy that grants you access to cPanel, follow the cPanel guide above instead.
Follow this guide to get SFTP credentials for your site hosted by GoDaddy Managed WordPress.
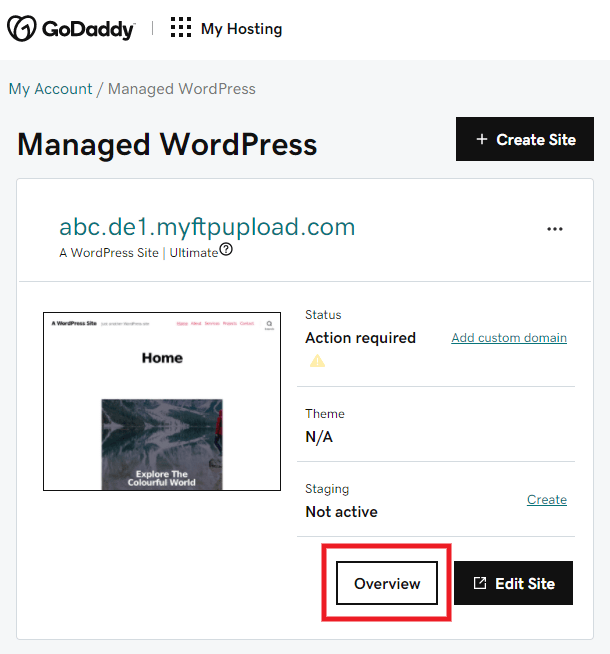
Once logged into your GoDaddy account, be sure you’re on the My Products page, and click the Manage button in the Managed WordPress section for the site you want to migrate.

On the next screen, click the Overview button for the site.
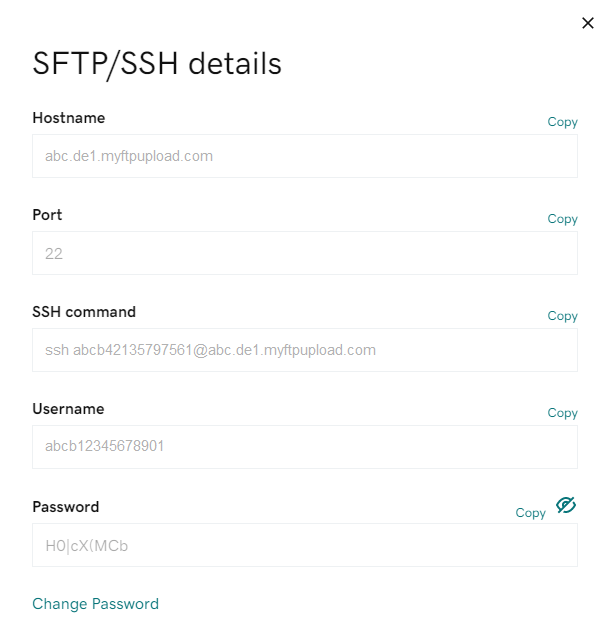
In the site Overview area, navigate to the Settings screen and click the View link in the SFTP/SSH details row.
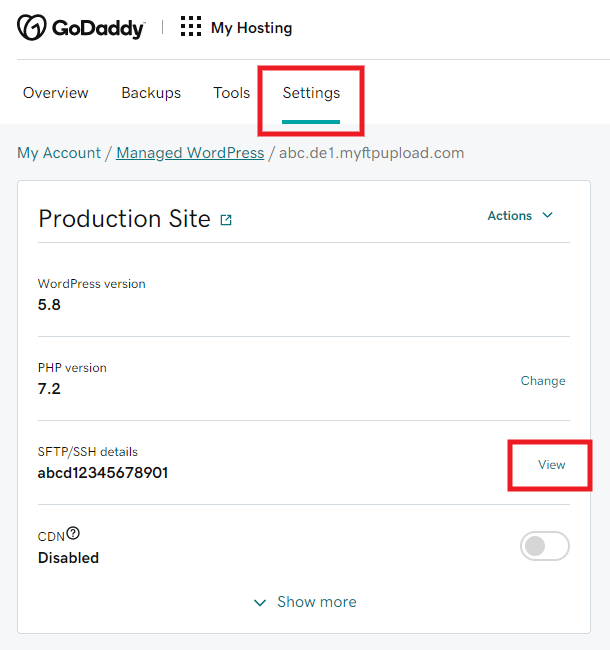
That will pop open a modal window with the SFTP Settings info you need.
If you are requesting a manual migration, you would provide the needed info as described in the Manual Migration by WPMU DEV Staff chapter above.
If you are migrating your site using the Migration Tool in your Hub, enter the FTP information in the Migrate Existing Site modal window as follows:
- Select the SFTP option for the protocol.
- The Hostname shown here is what you would enter for the Host.
- The Port should be set according to the protocol used by your host: GoDaddy Managed WordPress uses port 22.
- Leave the WordPress install path blank so the tool can connect to your WordPress root.

Once all the FTP information has been added in the Migrate Existing Site modal, click the Start Migration button. The time it takes to complete will depend on the size of the site you’re migrating.
1.8.6 DreamHost Managed WordPress (DreamPress)
Link to chapter 8Follow this guide to get FTP credentials for your DreamHost DreamPress hosted site.
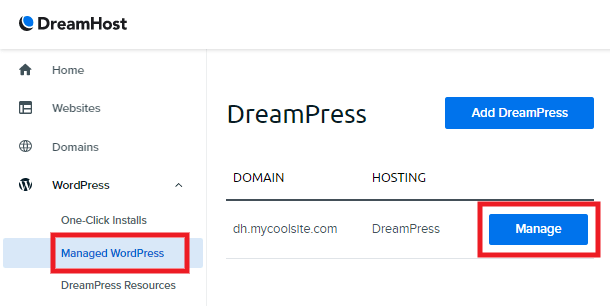
Once logged into your DreamHost account, click the Managed WordPress option in the WordPress menu in the sidebar. Then click the Manage button for the site you want to migrate.
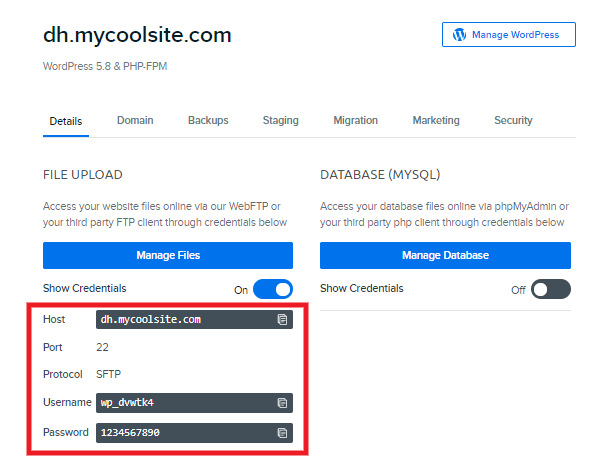
On the next screen, scroll down to the Manage Files section and toggle on the Show Credentials option. That will reveal the SFTP Settings info you need.
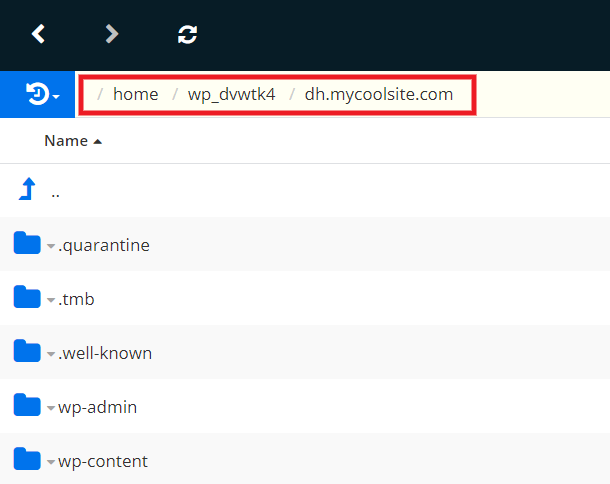
Unfortunately, it appears DreamHost does not display your WordPress install path anywhere in the control panel. So you’ll also want to click on the Manage Files button there to pop open their File Manager utility where you can get that info.
Once in the File Manager, be sure to navigate to the correct directory where your WordPress site is installed; it’s the directory that contains the wp-admin folder. Then copy the path that is displayed at the top of that screen.
If you are requesting a manual migration, you would provide the needed info as described in the Manual Migration by WPMU DEV Staff chapter above.
If you are migrating your site using the Migration Tool in your Hub, enter the FTP information in the Migrate Existing Site modal window as follows:
- Select the SFTP option for the protocol.
- The Host shown here is what you would enter for the Host.
- The Port should be set according to the protocol used by your host: DreamHost Managed WordPress uses port 22.
- Enter the WordPress install path that you copied above so the tool can connect to your WordPress root.
Once all the FTP information has been added in the Migrate Existing Site modal, click the Start Migration button. The time it takes to complete will depend on the size of the site you’re migrating.
1.8.7 Flywheel
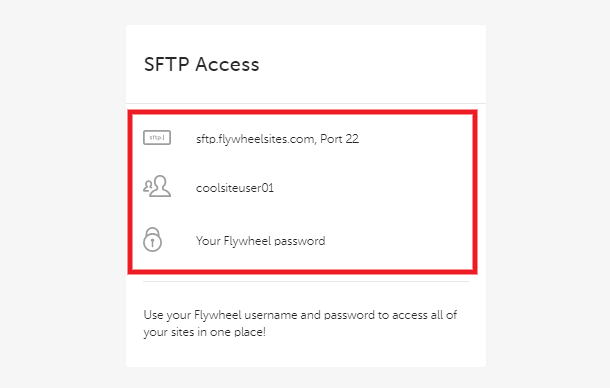
Link to chapter 8Follow this guide to get SFTP credentials for your Flywheel hosted site.
Once logged into your Flywheel account, click the Account option in your profile menu at the top-right of the screen.
You’ll then see the SFTP info you need displayed in the SFTP Access section on that screen.
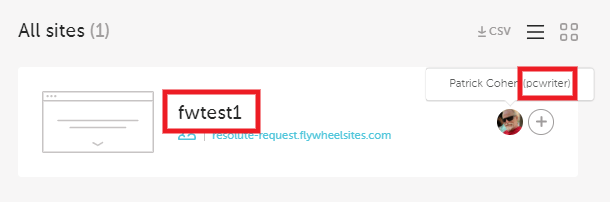
Unfortunately, it appears Flywheel does not display the WordPress install path for your site anywhere in their control panel. There are 2 ways to get that needed info though:
- Use the SFTP Access info as above in your preferred FTP Client to access your site files. Once you have navigated into the directory where your WordPress site is installed, you’ll see the install path displayed in the client. For example, this is what you might see in Filezilla where the path is indicated at the top where it says Remote Site:

- Alternatively, you can know what the install path is simply by combining your Flywheel username with the name of your site as it appears on the Sites screen. For example, if your username is pcwriter and your site name is fwtest1, then the install path would be: /pcwriter/fwtest1
If you are requesting a manual migration, you would provide the needed info as described in the Manual Migration by WPMU DEV Staff chapter above.
If you are migrating your site using the Migration Tool in your Hub, enter the FTP information in the Migrate Existing Site modal window as follows:
- Select the SFTP option for the protocol.
- Flywheel uses the same hostname for all sites, so enter sftp.flywheelsites.com for the Host.
- The Port should be set according to the protocol used by your host: Flywheel uses port 22.
- Enter the WordPress install path as above so the tool can connect to your WordPress root.
Once all the FTP information has been added in the Migrate Existing Site modal, click the Start Migration button. The time it takes to complete will depend on the size of the site you’re migrating.
If you have already SFTP’d into your site’s files, you may have noticed that the file structure of Flywheel hosted sites is rather unique in that the wp-admin folder, and many root files, appear to be missing. Our smart migration tool will detect that the site is hosted at Flywheel and will migrate the wp-content directory and the database, then install all missing files/folders from wordpress.org so your site will function as it should.
1.8.8 Kinsta
Link to chapter 8Follow this guide to get SFTP credentials for your Kinsta hosted site.
Kinsta automatically creates an SFTP account for each domain you add to your hosting plan.
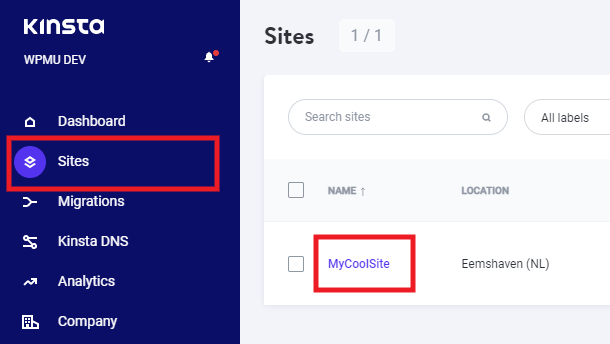
Once logged into your Kinsta account, navigate to the Sites screen, and click on the site you want to migrate.
On the next screen, in the Info section for your Live environment, scroll down to the SFTP/SSH area where you’ll find the SFTP info you need.
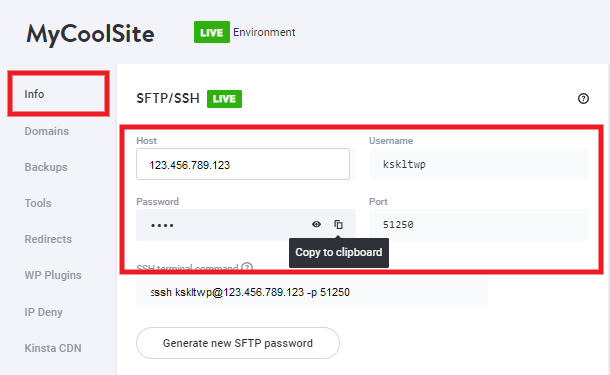
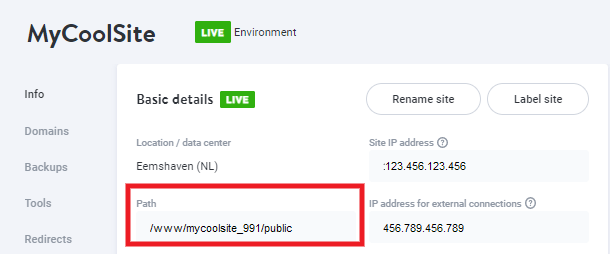
You’ll also want to take note of the Path shown in the Basic details area at the top of this same screen. This indicates the directory in which your WordPress site is installed.
If you are requesting a manual migration, you would provide the needed info as described in the Manual Migration by WPMU DEV Staff chapter above.
If you are migrating your site using the Migration Tool in your Hub, enter the FTP information in the Migrate Existing Site modal window as follows:
- Select the SFTP option for the protocol.
- The IP address shown in your Kinsta account for the Host is what you would enter for the Host.
- The Port should be set according to the protocol used by your host. Kinsta assigns different ports for different users, so it is important to copy the exact port shown in your account for your site.
- Enter the Path you copied above for the WordPress install path so the tool can connect to your WordPress root.
Once all the FTP information has been added in the Migrate Existing Site modal, click the Start Migration button. The time it takes to complete will depend on the size of the site you’re migrating.
1.8.9 Hostinger
Link to chapter 8Follow this guide to get FTP credentials for your Hostinger hosted site.
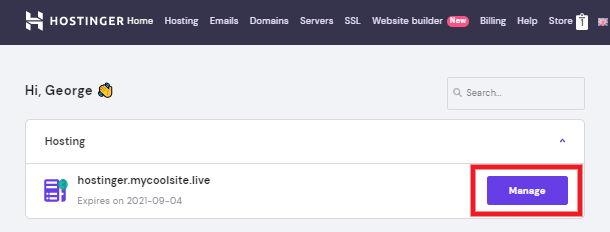
Once logged into your Hostinger account, click the Manage button for the site you want to migrate.
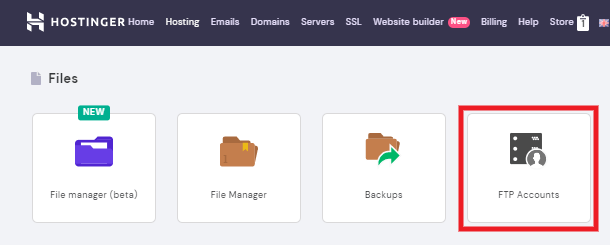
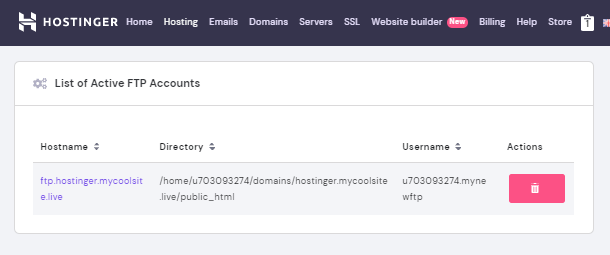
On the Hosting Account screen, scroll down to the Files section, and click on FTP Accounts.
If there is not already an FTP user available for which you know the password, you can simply create a new one for your migration.
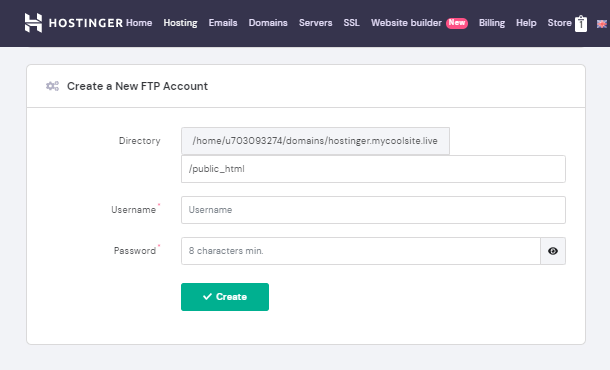
- Directory – This should be kept at the default so this FTP account can access the root directory for this site: /public_html
- Username – Enter the username you want for this FTP user.
- Password – Enter the secure password you want to use for this FTP user. You’ll want to take note of your chosen password for later use as it will not be displayed once the account is created.
Once you’ve entered all the information as above, click the Create button.
You’ll then see the new FTP account you just created in the List of Active FTP Accounts section just beneath the form you just submitted.
If you are requesting a manual migration, you would provide the needed info as described in the Manual Migration by WPMU DEV Staff chapter above.
If you are migrating your site using the Migration Tool in your Hub, enter the FTP information in the Migrate Existing Site modal window as follows:
- Select the FTP option for the protocol.
- The Hostname as shown here is what you would enter for the Host (be sure to remove the ftp:// part if you right-click and copy the link from that screen).
- The Port should be set according to the protocol used by your host: Hostinger uses port 21.
- Enter /public_html for the WordPress install path so the tool can connect to the root directory of your WordPress site.
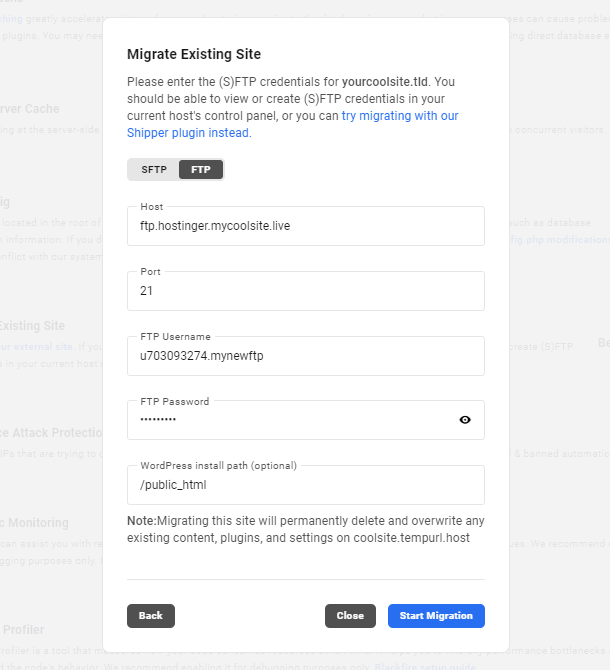
Once all the FTP information has been added in the Migrate Existing Site modal, click the Start Migration button. The time it takes to complete will depend on the size of the site you’re migrating.
1.9 Locations & Regions
Copy chapter anchor to clipboardMembers are free to choose the region in which their data is stored. We are currently partnered with Vultr, and maintain regional hosting facilities in the following locations:
| Region | 100% Renewable Energy |
|---|---|
| US – Atlanta | |
| US – Chicago | ✔ |
| US – Dallas | ✔ |
| US – Los Angeles | |
| US – Miami | |
| US – New Jersey | ✔ |
| US – Seattle | ✔ |
| US – Silicon Valley | |
| CA – Toronto | ✔ |
| NL – Amsterdam | ✔ |
| DE – Frankfurt | ✔ |
| GB – London | ✔ |
| FR – Paris | ✔ |
| KR – Seoul | ✔ |
| SG – Singapore | ✔ |
| JP – Tokyo | ✔ |
| AU – Sydney | |
| IN – Bangalore | |
| IN – Mumbai | |
| IN – Delhi NCR | |
| JP – Osaka | ✔ |
| ZA – Johannesburg | |
| ES – Madrid | ✔ |
| GB – Manchester | ✔ |
| AU – Melbourne | |
| MX – Mexico City | ✔ |
| CL – Santiago | ✔ |
| SE – Stockholm | ✔ |
| IL – Tel Aviv | |
| PL – Warsaw | ✔ |
Note that the regions marked with a checkmark “✔” are powered by renewable energy sources that are 100% sustainable.
At WPMU DEV, we’re always looking for ways that we can provide the best opportunity for a blazing-fast site, which means setting up data centers in strategic locations. In this case, we decided to test out just how much the addition of the data center in Australia impacted load times for an audience there. Check out our blog, Timed & Tested: Shave Seconds Off Your Load Time to read more about the results.
Changing Regions
The easiest way to migrate a site from one hosting region to another is by using our Clone tool in the Hub. For details on how to do that, please see the Migrate a Site to a New Region chapter above. You can also request a Manual Migration by WPMU DEV Staff as detailed above.
Members are free to migrate sites from one region to another at any time but should be aware that our hosted backups are regionally isolated and cannot be migrated with the site. Members should download any hosted backups they wish to preserve before initiating the migration. Hosting backups cannot be accessed from a different region, and we cannot move them for you after the fact.
Also, migrating a site to a new region will require the assignment of a new dedicated IP address, so all DNS settings will have to be reconfigured, including any IP address-dependent plugins or integrated apps.
Finally, there is downtime to consider. The original site will cease to function the moment the migration begins. The time required for the migration depends on the size of the site or sites being moved, and once the site is up in its new region, how long it takes to reconfigure its plugins and apps depends largely on the skill of the admins.
1.10 Plans & Usage Limits
Copy chapter anchor to clipboardEach site that we host gets its own plan, complete with its own dedicated IP, memory, CPUs, storage, and usage limits. Each site also comes with its own database of course, but in our Managed Hosting for WordPress, it is not possible to create additional databases for your sites. See all plans and specs for details.
Curious about how our hosting holds up against other popular hosting services on the market? Well, even if you weren’t curious, we definitely were! So, we decided to put them all to the test and thought we’d clue you in on exactly how we did that – full transparency. Check out How to Accurately Test Your WordPress Host for more information on the tests we conducted and what online resources we used.
You are free to upgrade the hosting plan of any site at any time you need. Note that the staging environment of your site (if you have that set up), is hosted on the same server as the live site, so you would not lose your staging environment when upgrading your site.
However, due to server architecture and disk sizes, downgrading a plan, or upgrading from a Regular to a High Frequency plan (or vice-versa), are not directly possible. See Upgrading or Downgrading Your Hosting Plan below for important information.
We do not set hard limits on visits, bandwidth, or traffic, but your site will have lower performance, including brief outages, when your memory and CPU resources are maxed out.
Factors that might use more resources and thus require you to upgrade:
- WordPress Multisite – Multisite networks are more taxing on server resources, especially Subdomain installs and those Multisite where you will have many logged-in users.
- Membership Sites – Membership sites receive a higher percentage of traffic where users are logged in, which means that caching systems in place are not as helpful in managing their load.
- e-Commerce Sites – Similar to Membership sites, increased logged-in activity for checkout can cause a higher server load.
- Poorly coded themes or plugins – Some themes and plugins just aren’t as efficient for performance as others, and may add features that require higher processing loads. However, if a theme or plugin is so poorly coded that it slows your site to a crawl, or is throwing fatal errors, upgrading your plan would likely not improve performance until those issues are investigated and resolved.
Each hosting plan is for a single droplet, and we allow only one WordPress installation per hosting droplet. But that can contain unlimited sites if converted to multisite.
Unlike other hosts, we don’t limit what plan you can use to host WooCommerce. However, if you choose to use WooCommerce with other resource-intensive plugins and/or have high site traffic, we recommend the Gold hosting plan or above. For additional details, check out our blog post on WooCommerce Hosting.
Virtual CPUs
You will notice that each hosting plan offers a different number of shared vCPUs. These virtual CPU cores play a key role in determining your site’s performance. However, it is important to note that performance is controlled by more than just the number of vCPUs and simply having more vCPUs will not necessarily improve your performance. Your site will also be heavily affected by the dedicated RAM and so the balance between RAM and vCPUs is worth noting. All of our hosting plans have been allocated specific RAM and vCPUs with that ratio in mind.
Maximum Parallel Users
On any of our hosting plans, the maximum number of parallel users is not technically restricted, but it is dependent on a variety of factors, including but not limited to plugin and theme performance. For more information, check out our hosting comparison page.
Memory Limits
A certain amount of RAM can be allocated specifically to WordPress. WPMU DEV hosting sets WP memory limits for each hosting plan as follows (these limits apply to both regular and High Frequency plans in each level):
- Quantum – 128Mb
- Bronze and Silver – 256Mb
- Gold – 512Mb
- Platinum, Uranium, Titanium and Palladium – 2048Mb
Memcached Memory Limit
Memcached is an open-source distributed memory caching system that caches data and objects directly into the memory (RAM). It helps in reducing the database load resulting in a better performance. The memcached memory limit for each hosting plan is as follows:
- Quantum – N/A – Object Cache is not available on sites hosted on this plan. See Quantum Plan Restrictions for details.
- Bronze – 32 MB
- Silver – 128 MB
- Gold – 512 MB
- Platinum – 1024 MB
- Uranium – 1280 MB
- Titanium – 1536 MB
- Palladium – 1792 MB
PHP Workers
Your site’s performance can be impacted by the number of PHP workers/max children, as these processes are responsible for running PHP on the server. Each hosting plan offers a different number of PHP workers as follows:
| Regular Plan | High Frequency Plan |
|---|---|
| Quantum – 3 PHP workers/max children | |
| Bronze – 5 | Bronze Plus – 5
Bronze Max – 5 |
| Silver – 12 | Silver Plus – 12
Silver Max – 12 |
| Gold – 55 | Gold Plus – 55 |
| Platinum – 115 | Platinum Plus – 115 |
| Uranium – 205 | Uranium Plus – 205 |
| Titanium – 410 | |
| Palladium – 614 |
Although both the Regular and High-Frequency hosting plans have the same number of PHP workers, the High-Frequency hosting plans offer better performance due to an enhanced CPU with more than 3.X GHz and a faster NVME disk.
Max Concurrent Connections
In addition to a specified number of PHP workers, performance can be impacted by the number of concurrent MySQL database connections available to your site. The maximum concurrent MySQL database connections for each hosting plan is as follows:
- Quantum – 25 concurrent MySQL connections
- Bronze – 50
- Silver – 150
- Gold – 300
- Platinum – 500
- Uranium – 800
- Titanium – 1000
- Palladium – 1200
InnoDB Buffer Pool Size & Instances
InnoDB buffer pool is the memory space allocated to the frequently accessed data and index entries from InnoDB tables. The InnoDB buffer pool size and instances for each hosting plan are as follows:
Plan
Quantum
Bronze
Silver
Gold
Platinum
Uranium
Titanium
Palladium
InnoDB Buffer Pool Size
64MB
256 MB
512 MB
4096 MB
8192 MB
12288 MB
16384 MB
20480 MB
Instances
1
1
1
2
4
8
12
16
Maximum Execution Time
The default value of the max_execution_time variable is 300 seconds on all hosting plans and will always reset to that value.
Maximum Upload File Size
The default value of the upload_max_filesize and post_max_size variables is 128MB on all hosting plans and will always reset to that value.
1.10.1 Upgrading or Downgrading Your Hosting Plan
Link to chapter 10As noted above, you are free to upgrade the hosting plan of any site at any time you need.
To get started, click the Hosting tab of your site in your Hub. Then, on the Overview screen, click the Upgrade button that appears in the Plan row.
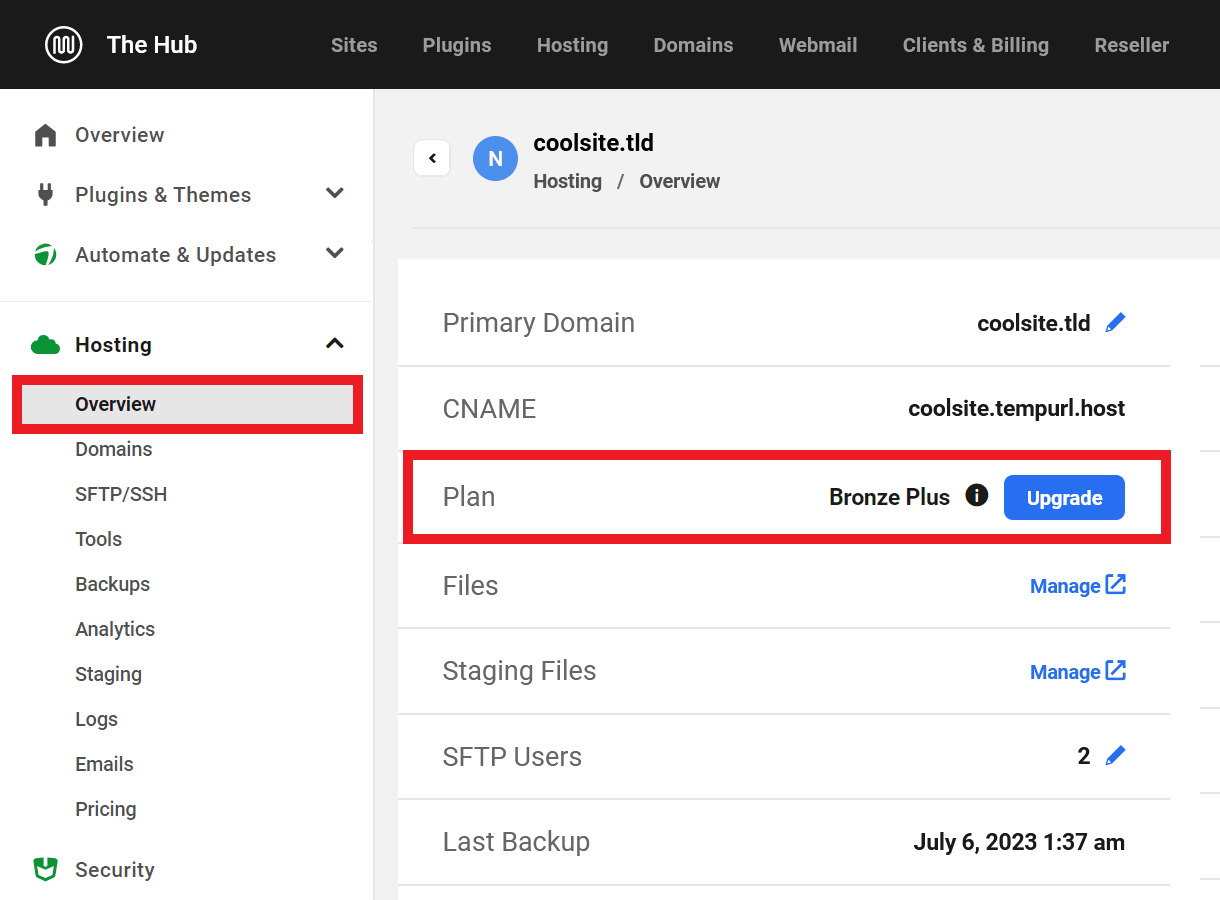
That will pop open a modal window where you’ll see all the different plans to which you can upgrade your site.
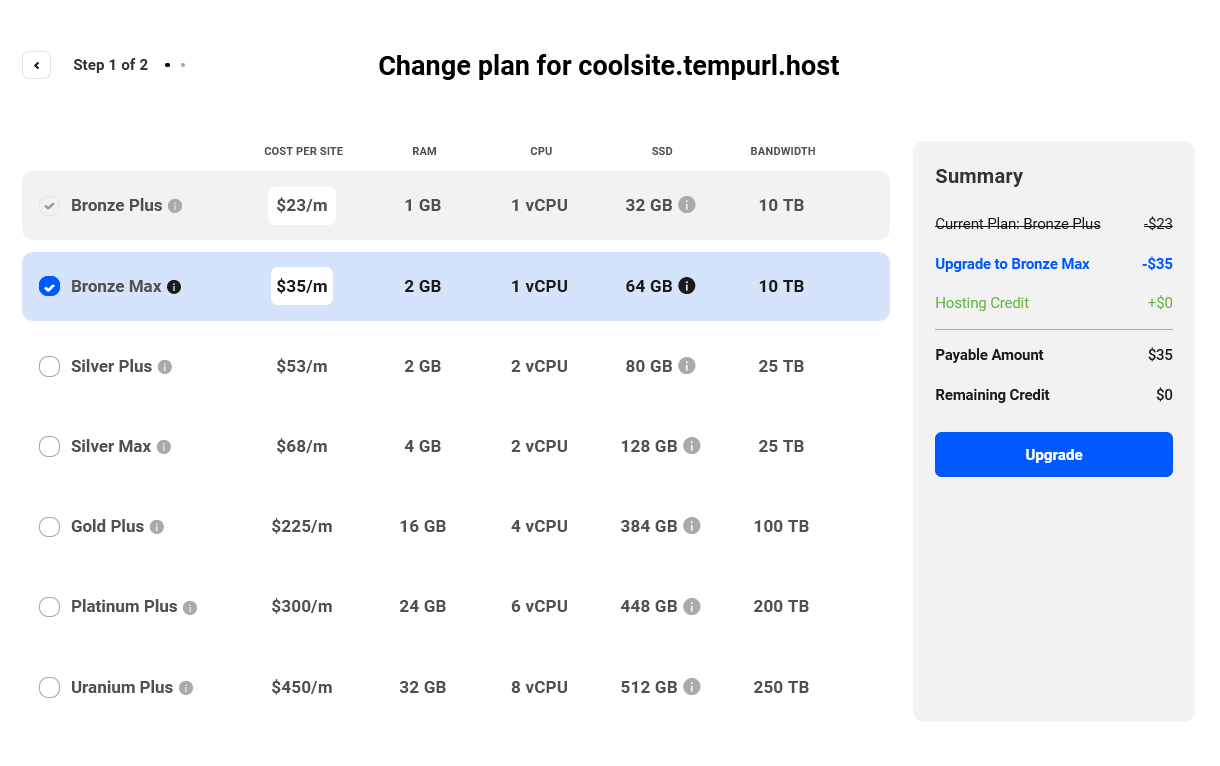
Upgrading & Downgrading Limitations
Due to server architecture and disk sizes, downgrading is not directly possible. Plans lower than the one your site is currently hosted on are therefore locked.
Additionally, you cannot switch an existing site from a Regular plan to a High Frequency plan, and vice versa. In other words, if your site is currently on a Regular hosting plan, you can only choose to upgrade to another Regular plan. The same applies to the more performant High Frequency plans.
Similarly, if your site is currently hosted on a monthly plan, it cannot be switched to a yearly hosting plan or have its billing changed to a yearly plan, or vice-versa.
With the above in mind, if you do need to downgrade a site to a lower hosting plan, switch from a Regular to a High Frequency plan (or vice-versa), or switch from monthly to yearly billing (or vice-versa), you have a few options. Note that any of these options would delete an existing staging environment.
- You can migrate the original site to a new site on the new plan or billing cycle, then delete the old site.
- Or create a template from the original site and use that template to create an exact duplicate of the site on the new plan or billing cycle, then delete the old site.
- Or create a backup of the site and delete the site. Then recreate the site on a different plan or billing cycle with the same tempurl address and in the same region. You’ll then see the backup you just created that you can restore on the new site.
If you choose either option 1 or 2 above, be sure to create and download a backup of the original site first, so you have something to fall back on if needed. Then take a moment to verify that the new site looks & works as it should. Finally, delete the original site. Either of these options would incur a minimal additional cost for the time both sites exist. For all upgrades, we would of course prorate you the cost difference in the form of account credits. We’d also prorate you credits for the paid-for time you didn’t use on the higher plan when migrating a site to a lower plan. See Does it cost me anything to move the site like this above for examples of the cost involved in creating or migrating a site in this manner.
These methods would also give your new site a new IP address. So you’ll want to be sure you’re following our recommendations and doing one of the following:
- Manage your domain’s DNS in your Hub so A & AAAA record changes can be made with minimal fuss & downtime.
- Or, use a CNAME record at your current registrar (if possible) to map your domain to the tempurl.host domain of your site so you don’t need to change A & AAAA records.
- Or, route your domain through Cloudflare for added security, and use the CNAME method there instead.
See our Registrar Guides and 6 VERY Good Reasons to Manage Your DNS with WPMU DEV docs for DNS help if needed.
1.11 System Information
Copy chapter anchor to clipboardAs a WPMU DEV member, you can find this same information, and much more, detailed under Support > System Information in the WPMU DEV Dashboard installed on your sites.
Database
The databases of all sites hosted by WPMU DEV run on MariaDB based on MySQL 7/8.
PHP
The following PHP extensions are enabled by default on all hosted sites.
- bcmath
- blackfire
- calendar
- cgi-fcgi
- Core
- ctype
- curl
- date
- dom
- exif
- FFI
- fileinfo
- filter
- ftp
- gd
- geoip
- gettext
- hash
- iconv
- igbinary
- imagick
- imap
- intl
- ionCube Loader
- json
- ldap
- libxml
- mbstring
- mcrypt
- memcache
- memcached
- msgpack
- mysqli
- mysqlnd
- newrelic
- openssl
- pcre
- PDO
- pdo_mysql
- Phar
- posix
- readline
- redis
- Reflection
- session
- shmop
- SimpleXML
- soap
- sockets
- sodium
- SPL
- standard
- sysvmsg
- sysvsem
- sysvshm
- tokenizer
- xml
- xmlreader
- xmlrpc
- xmlwriter
- xsl
- Zend OPcache
- zip
- zlib
1.12 Content Compression
Copy chapter anchor to clipboardBrotli compression is enabled by default on all sites we host. Brotli is a more performant compression method than the traditional Gzip.
If you are using a browser that does not yet support Brotli, the compression method will fall back to Gzip.
What Does Brotli Compress?
The following MIME types are compressed by Brotli:
- application/atom+xml
- application/javascript
- application/json
- application/rss+xml
- application/vnd.ms-fontobject
- application/x-font-ttf
- application/x-font-opentype
- application/x-font-truetype
- application/x-javascript
- application/x-web-app-manifest+json
- application/xhtml+xml
- application/xml
- font/eot
- font/opentype
- font/otf
- image/svg+xml
- image/x-icon
- image/vnd.microsoft.icon
- text/css
- text/plain
- text/javascript
- text/x-component
Using Cloudflare?
If you are using one or more optional optimization methods available at Cloudflare, you should know that Cloudflare will decompress request responses before compressing them again using the compression method available on your plan: Brotli is enabled only on their Pro & Business plans, while the free plan will compress using Zstandard, and Gzip will be used for Enterprise users.
See this help article for more information.
How to Check if Brotli is Enabled
If you’re familiar with your browser’s developer tools, you can simply check the Content-Encoding response header for your page. If it indicates br, Brotli is being used.
You can also use an online tool like GiftOfSpeed which will tell you if Brotli or Gzip is used.
Does My Browser Support Brotli?
If you’re not sure if the browser you are using supports the Brotli method, you can check that here.
1.13 Modifying Size and Type Limits
Copy chapter anchor to clipboardWPMU DEV Max Upload File Size
The maximum file upload size for all WPMU DEV-hosted sites is 128Mb, regardless of hosting plan, and this value cannot be increased.
You can however decrease the limit using a plugin if needed; see Standard Installation Upload File Size below for details. In a multisite environment, you can reduce this value for your subsite admins; see Multisite Upload Limits below for details.
This cap should be more than enough for most sites, and is set on our managed hosting for WordPress to limit the potential of attacks that can exploit large file size limits with huge post requests and overload your server.
Files larger than 128Mb should be uploaded by SFTP/SSH. See our SFTP & SSH documentation for information on how to upload large files.
As an alternative, you may wish to try the excellent Big File Uploads plugin which breaks large files into smaller chunks so you can upload files of virtually any size you may need.
To view the current maximum upload size for any site, navigate to the WordPress media uploader: Dashboard > WP Admin > Media > Add New. The upload size limit will be displayed at the bottom of the UI.
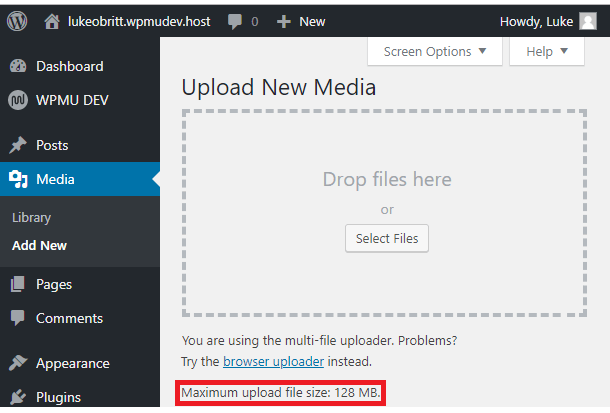
WordPress Default File Types
Members can add or remove file types from the allowed upload list as needed but should keep in mind that each added file type creates a potential security risk for your site or network. We recommend that you add only those file types you need.
WordPress allows uploading of these file types by default:
Images: jpg, jpeg, png, gif, ico
Documents: pdf, doc, docx, ppt, pptx, pps, ppsx, odt, xls, xlsx, psd
Audio: mp3, m4a, ogg, wav
Video: mp4, m4v, mov, wmv, avi, mpg, ogv, 3gp, 3g2
1.13.1 Multisite Upload Limits
Link to chapter 13Multisite admins can adjust both the file size and file type limits in their Network Settings, located here: Dashboard > Network Admin > Settings > Network Settings.
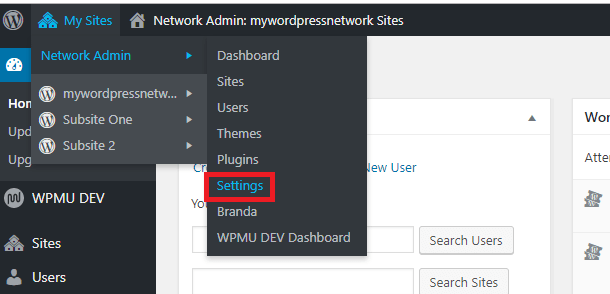
Scroll down to the Upload Settings section, where you will find the Upload file type and Max Upload File Size fields.
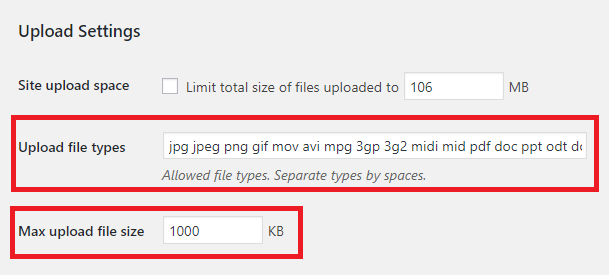
Adding/Removing File Types in Multisite
In the Upload file types field, enter the file extensions of the file types you want to add, separating the extensions with a single space. Delete the extensions of file types you do not want to be uploaded.
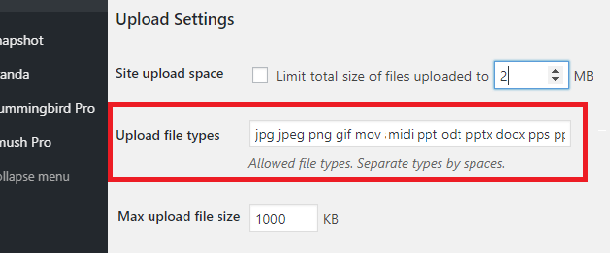
Modifying the File Size Upload Limit in Multisite
In the Max Upload File Size field, enter a size, in kilobytes, up to 12800kb (128mb) to set the max size for files uploaded to this network.
Click Save Changes, and that’s all there is to it. The new file size limit will apply to every site within this network.
1.13.2 Standard Installation Upload Limits
Link to chapter 13If you’ve seen the “Sorry, this file type is not permitted for security reasons” error message; you’ve tried to upload a file type that is not on your site’s upload allowed list or has failed a WordPress security validation test.
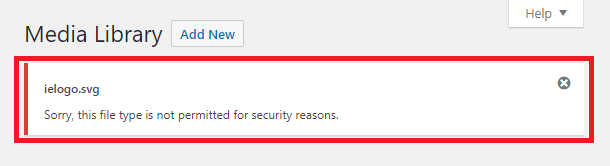
Adding/Removing File Types in Standard Installations
You can add allowed file types to your site using a plugin or with a simple code snippet.
There are a few such plugins available for free in the WordPress.org plugin repository. One of the simplest to use is very aptly named File Upload Types.
Just install and activate the plugin. Then go to Settings > File Upload Types in your site admin and select the types you want to allow on your site. Click Save Settings and you’re done.
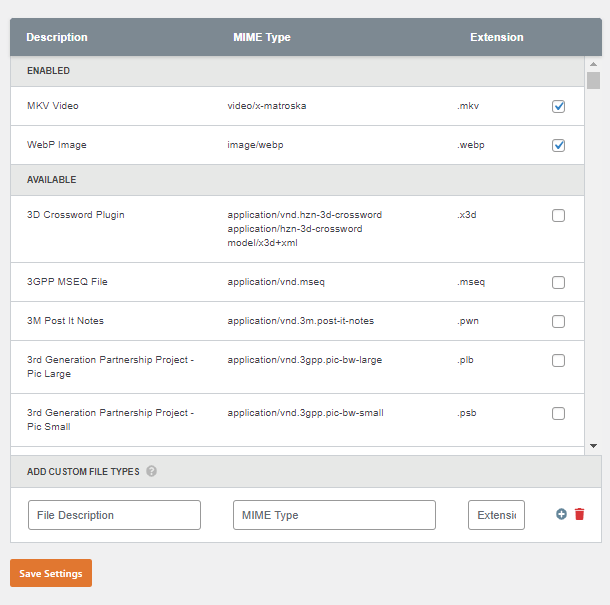
If you prefer a code method, simply copy this code to a new .php file with any name you like, and adjust the list to include the mime types you want to add. Then upload the file to your mu-plugins directory.
If you need help finding the correct format for a mime type you want to add, here’s a handy list, associated by type of documents, and ordered by their common extensions: https://docs.w3cub.com/http/basics_of_http/mime_types/complete_list_of_mime_types
1.13.3 Standard Installation Upload File Size
Link to chapter 13This chapter provides an example of decreasing the max upload file size using a plugin like Increase Maximum Upload File Size.
Once the plugin is installed and activated, Increase Maximum Upload File Size will appear as a new option near the bottom of your Settings menu.
The plugin contains a single dropdown menu. When you open the UI for the first time, it will display your current max upload file size.
Click the dropdown menu to view the various upload size limits. Select the desired upload limit and click Save Changes. Remember that selecting a file size larger than 128MB will not override the 128MB limit on our hosting.
Once a limit has been set, the plugin displays both the WPMU DEV Managed Hosting default limit of 128mb and the lower limit established by the plugin.

1.14 Modifying File Permissions
Copy chapter anchor to clipboardModifying file & folder permissions on sites we host is not allowed.
Folder permissions will always default to 755, and files to 644.
1.15 WPMU DEV Server Error Pages
Copy chapter anchor to clipboardSites hosted by WPMU DEV display a clear white-labeled error page if there’s ever a server-side issue with your site. The available error pages are as follows.
Client error pages
401.html – Displays if the site has password protection enabled and the HTTP Auth form is dismissed by the user. Note that if a user has a popup blocker enabled in their browser, the HTTP Auth form might not appear, and they’d want to disable the extension for that site.
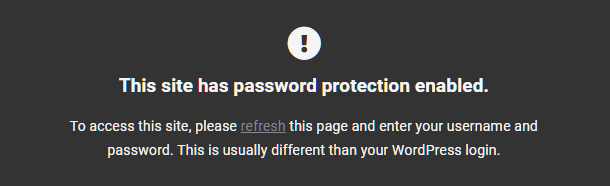
402.html – Displays if the site is suspended due to required payment on your account.

403.html – Displays if a connection is forbidden, possibly via a WAF rule.
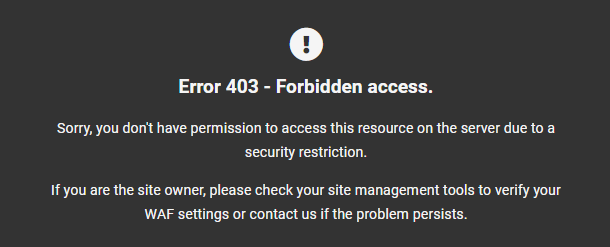
404.html – Displays when the URL or page requested by the user cannot be found.

410.html – Displays if the requested page has been deleted permanently.
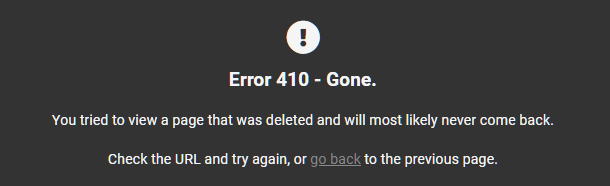
429.html – Displays to a user/IP if they’re attacking /wp-login.php or /xmlrpc.php (See our Bruteforce Attack Protection doc for details).
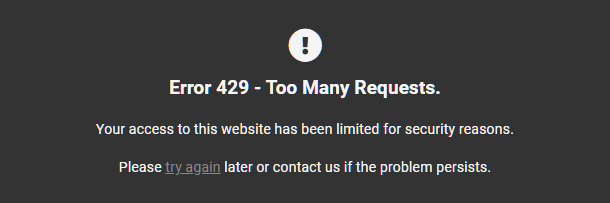
Server error pages
500.html – Displays if there is an internal server error.
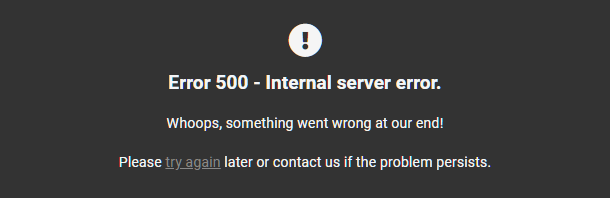
502.html – Displays if your server gets an invalid response from another web server.

503.html – Displays if the server is currently unable to handle your request due to scheduled maintenance or a temporary overload.
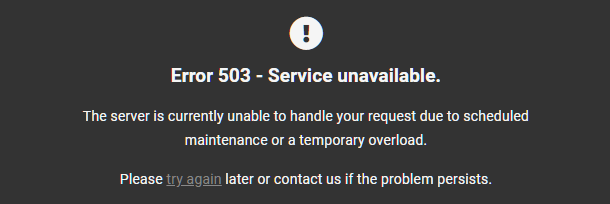
504.html – Displays if the server timed-out handling your request due to a temporary overload or a long-running script.
1.15.1 Customizing error pages
Link to chapter 15You can take white labeling to another level by customizing the server error pages with your brand, or any custom information you may want.
So, for example, if you’re not too enthusiastic about our default error 500 page:
You could create something much more suited to your brand:
How to customize
To create a custom page for any of the above errors, create a .html file with the error number as the filename, with any content you wish inside. Then upload it to the root of your WordPress install.
For example, to create a custom error page in the unlikely case something goes wrong on your server and you get the dreaded “500 internal server error”, you’d create a file called 500.html
Add any custom HTML content you like to your file, and upload. You can use the Manage Files utility from your Hub > Tools screen to create and add content to the file, or edit on your computer and upload via the File Manager or FTP.
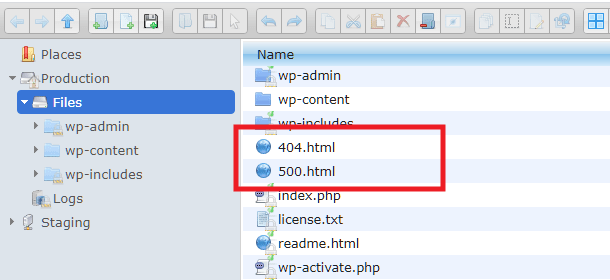
Here’s an example of the basic HTML you’d want to have in any custom error page:
Your custom pages can be as simple or as creative as you like, and branded however you need. If you need some inspiration, have a look at these pages for some great examples:
https://uicookies.com/500-error-page-templates/
https://freefrontend.com/html-css-404-page-templates/
1.15.2 More whitelabeling options
Link to chapter 15Our White Label services allow you to remove all WPMU DEV branding so that you can use your own branding or even your client’s branding. This is largely offered as a tool through our WPMU DEV Dashboard Plugin. For a guide to rebranding with the WPMU DEV Dashboard Plugin, read our White Label Plugins document.
The process of white labeling your site is also closely linked to our Branda plugin. Branda simplifies white label branding, maintenance, and much more. Read our WPMU DEV documents on Branda to learn more about the plugin’s capabilities.
And if you’re using our Hub Client plugin to offer all the amazing site management tools of our Hub to your clients, you’ll want to review the Hub Client documentation as well.
1.16 WordPress Multisite
Copy chapter anchor to clipboardUnlike many hosts, we support both subdirectory (eg., yoursite.tld/subsite) and subdomain (eg., subsite.yoursite.tld) multisite configurations on all our hosting plans, with the exception of Quantum, which is not suitable for multisite installations. See Quantum Plan Restrictions for more information.
You can enable multisite for any WPMU DEV hosted site with the flick of a switch under the Tools tab of your site in your Hub. See the Multisite chapter in our Hub > Tools documentation for details.
We also provide free Wildcard SSL Certificates for your multisite, although you can provide your own Custom SSL Certificates if you prefer.
If you want to map custom domains to subsites in your multisite, it’s is a simple 3-step process. See our Multisite Domain Mapping guide for details if you’re not sure how.
You should be aware though that WordPress Multisite networks will use more server, CPU, and memory resources than standard WordPress single installs. So, if you have more than a handful of subsites in your multisite, you might find you need one of the higher plans to meet your WordPress Multisite network’s needs.
Why Subdomains Are Discouraged
There are two types of Multisite installations:
- Subdirectory (ie. mysite.com/sitename)
- Subdomain (ie. sitename.mysite.com)
There are several performance, SEO, and technical reasons why we recommend going with a subdirectory install whenever possible.
Here are a few:
- Most SEO experts recommend subdirectories to maximize content and domain authority for your site. Google is believed to treat subdomains as separate web sites, which will impact SEO.
- Subdomains usually see higher legitimate bot and crawler traffic, which can increase load and decrease performance (or require higher hosting plans). This is because the bots and crawlers see each subdomain as their own site and may crawl each subdomain simultaneously.
- Subdomains can make it harder to prevent and mitigate DDOS attacks.
1.17 Get Support
Copy chapter anchor to clipboardIf you still have questions or need assistance after reading this document, please don’t hesitate to contact our support superheroes using the available options under the Support tab in your Hub or via the Support tab in your WPMU DEV Dashboard.

1.17.1 .htaccess Support
Link to chapter 17Our servers run NGINX, the fastest, most stable webserver type, and NGINX does not support .htaccess. Members accustomed to using .htaccess to enable or disable functionality needn’t worry because our servers automatically handle all the functions typically associated with it.
Servers with the AllowOverride directive on, a prerequisite for .htaccess files, process requests at a much slower rate than NGINX servers. In fact, NGINX servers process many more requests per server than their Apache counterparts in large part because they don’t support .htaccess.
If your site has a .htaccess file in the root directory, WordPress or a plugin might attempt to write to that file when configurations change, but this is not a problem as our servers will simply ignore that file.
Some of the common uses for .htaccess that our servers automatically achieve are:
- Permalinks – Our servers are configured to automatically handle permalinks for you.
- Caching – Our servers handle caching for you, no need to install plugins or modify .htaccess files.
- Redirects/rewrites – Redirects can be handled using a plugin or via custom server-side redirects that WPMU DEV support can install for you.
- Security – Many WordPress security plugins have you modify the .htaccess file to install security rules. Fortunately, WPMU DEV hosting already has these security precautions in place at the server level.
Regardless of what you’re trying to achieve, contact support as noted above and we will help you figure out how to implement the same thing without creating or modifying a .htaccess file.
1.17.2 nginx.conf Support
Link to chapter 17As noted above, our server architecture is built on Nginx which does not support .htaccess. However, there may be times when you need some custom rules added to your server, to handle some 3rd-party plugin functionality for example.
As our system is managed WordPress, you do not have root access to the server, so cannot make those changes yourself.
In cases like this, simply contact support and we’ll review the code you wish to add. If it’s compatible with our server infrastructure, we’ll be happy to get it added for you.